StaR Installation
Welcome
This is the COMPASS Statistical Report (StaR) Guide. This section describes who should read this guide, how the guide is organized, and other resources related to COMPASS StaR.
We have made several changes in how data is processed and persisted in the database. Older versions were dependent on Hibernate for database operations but in this version, we have benefited from both JDBC and Hibernate. Thanks to this approach, the new StaR provides a performance enhancement of up to 10 times. For these reasons, we have introduced a version of 2.0.
Required knowledge and skills
Use of this guide assumes the developers are familiar with the following:
• DBMS and SQL
• Strong knowledge of the COMPASS Input-/Result-Interface (XML-API)
• Business knowledge regarding the COMPASS Interfaces
What’s new
The following table describes the important changes since the last release of this product.
Change |
Description |
Version |
Service Release |
This version includes following features and changes; |
2.2.3 |
This version includes following features and changes; |
2.2.2 |
|
This version includes following features and changes; |
2.2.1 |
|
This version includes following features and changes; |
2.2.0 |
|
This version includes following features and changes; |
2.1.3 |
|
This version includes following features and changes; |
2.1.2 |
|
This version includes following features and changes; |
2.1.1 |
|
This version includes following features and changes; |
2.1.0 |
Important note regarding releases from 2.0 on
Structural changes in the underlying database tables require a complete removal of all existing StaR tables for all older versions. We recommend dropping all existing tables, however if this is not desired, then please see section 6.3 for how to migrate data to the new tables.
It is also important to note down that the recent security vulnerabilities due to the log4j dependency of version 2.10.0 in previous StaR versions were overcome thanks to the updates of this dependency to version 2.16.0 and 2.17.1 respectively.
Introduction
StaR is part of COMPASS, the automated underwriting tool. COMPASS assesses all kind of Life and Health insurance applications and stores the assessment cases and results in a database. It is then possible to run this statistical module over these assessment cases and results, to extract statistically relevant data. The application has no user interface to create or maintain reports. The data resulting from the tool can be extracted with 3rd party Business Intelligence (BI) tools.
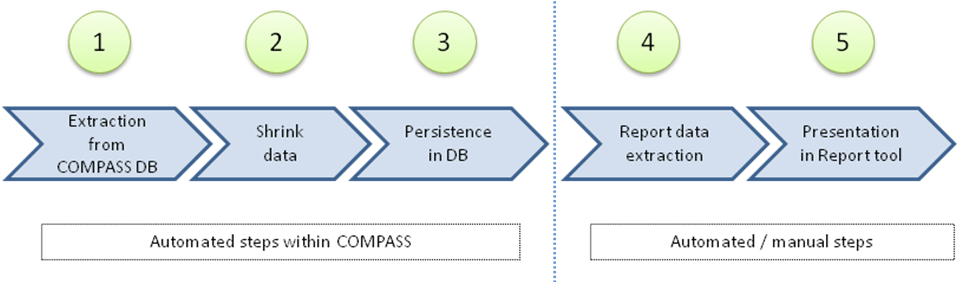
In older versions, that the database to be used had to be created manually first but this is no longer required, StaR can now create the database along with the tables on its own.
Data Creation Process
In this section we explain how the StaR generates statistical data from the cases and results assessed by COMPASS. In the following figure, the data creation process is covered in general.
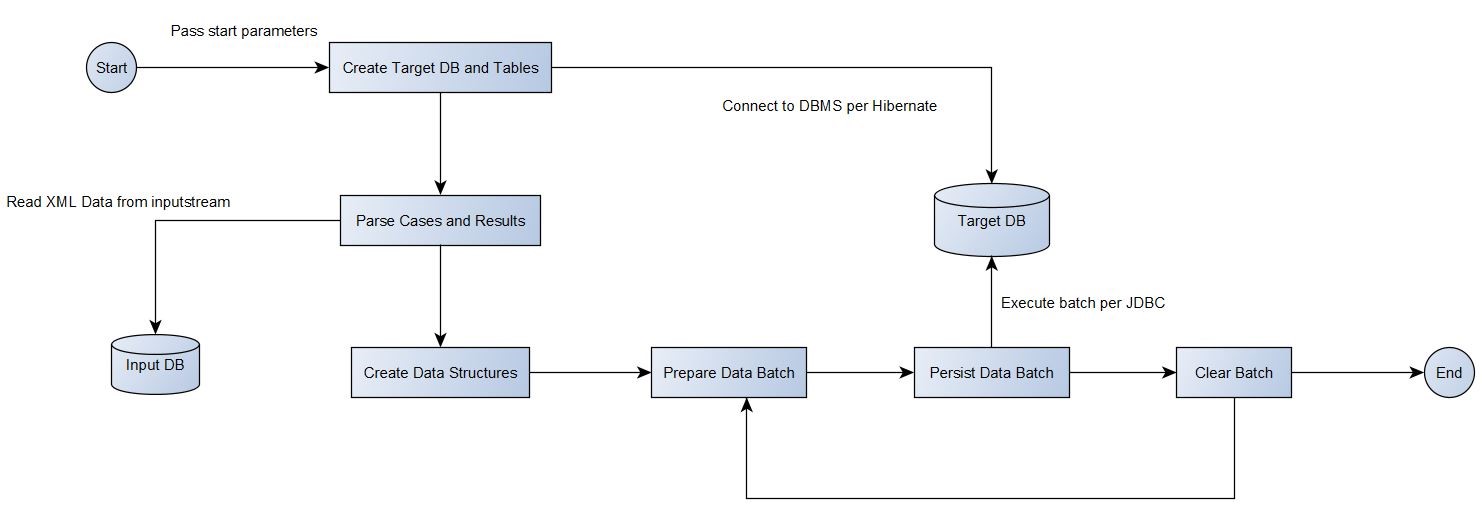
Firstly, we have to mention that there are two data sources here, input and target databases. Our input database is where the assessed cases and results are stored in table columns in xml format and the output database where StaR stores the processed data.
When StaR is started, firstly the target database is created, the Hibernate undertakes this task. Hibernate connects to the DBMS and performs the creation of the database along with the tables. When this step is completed, StaR connects to the input database and creates an input stream from the cases and results, the XML elements are parsed, and data structures are created. The data structures consist of nested classes which correspond to the structure of XML elements.
The structure of XML elements looks generally as follows;
<Case Complete="Yes" ...
	<Source Complete="Yes" ...
		.
	<PosRequest...
		.
	<CaseObject Id="0" TypeId="25" TypeIdName="Antrag">
		<CaseAttribute TypeId="0" TypeIdName="Antrags-ID">
			<CaseAttributeValue>
				<StringValue Value="Tess_NI_01_Dec"/>
			</CaseAttributeValue>
		</CaseAttribute>
		<CaseAttribute...
			.
			.
		</CaseAttribute>
		.
		.
	</CaseObject>
	<Benefit...
		.
		.
	</Benefit>
</Case>
In this case the data structure looks as in Figure 3;
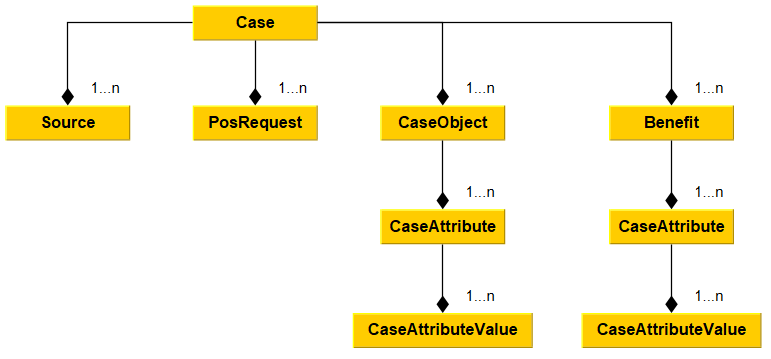
This data structure is just a rough representation of a parsed case.For each case and result, a Case and a Result classes are created, however as it is explained in the Section 5, StaR can also create only a case class for each parsed case, if results are empty or missing. It is also important to note that Cases might also contain EventPayment and Payment objects and they might contain CaseAttributes and CaseAttributeValues and CaseObjectRelations as well. Please note that CaseObjectRelations are Case specific elements and can only be found within them. CaseRisks, RiskCaseObjectRelations, CaseResult, CaseResultAttributes and AttributeValues are Result specific elements and likewise they can only be found within results.
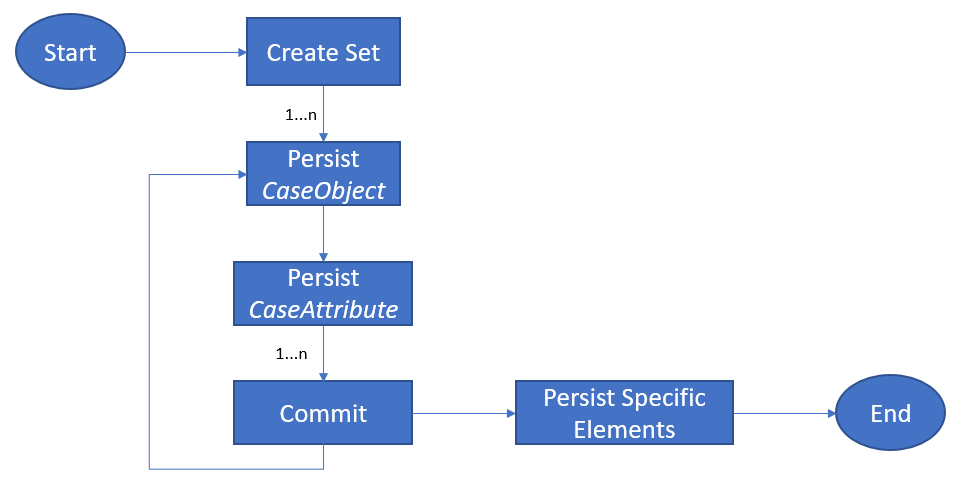
In general, every XML element that appears on the assessed cases and results is represented by a class with the same name with its corresponding attributes. This is important to note because the Case and Result elements are persisted separately to the database. When the parsing of XML elements and creation of data structures are finished, StaR begins to prepare data batches for every element. All of the persistence operations are carried out with JDBC and its’ API provides methods for creating and executing batches. Writing entries to the database in batches is faster and more efficient. This is one of most the important reasons for the improved performance of the version 2.0. The following figure represents the general steps in how data is persisted into the target database;
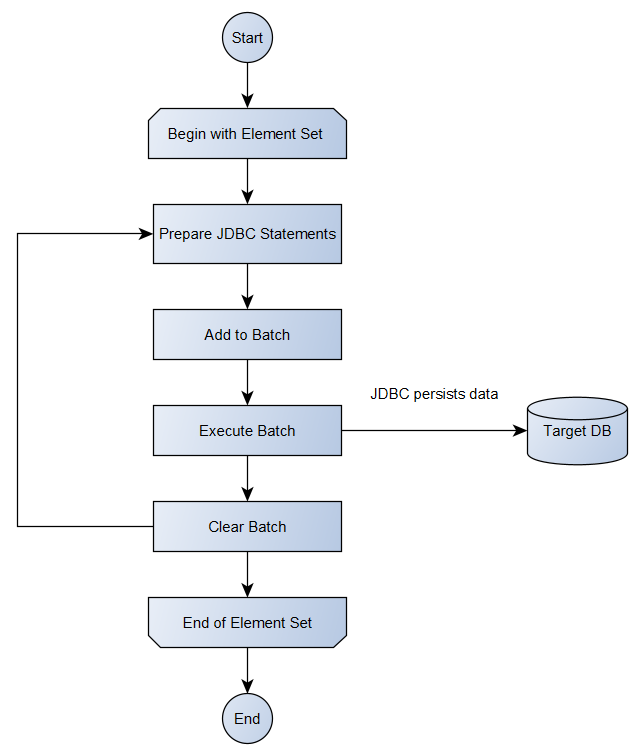
Since we have nested data structures and every XML element within a case and result consists of multiple elements, there is a specific order in how an element is persisted into the database. According to this order, the batches are prepared. When a batch is ready after all the relevant elements are added to it, the batch is executed, and elements are committed in the database. After database commit and the batch is cleared. If the batch size becomes too big, the heap space can be run out of and eventually an OutOfMemoryError could be thrown. Even if this error is not thrown, clearing the batches helps with the performance.
When we start executing batches and persisting data into the database, the persisting process happens in a specific order. This is due to the fact the created tables have foreign key constraints, therefore in order for all of the elements to be successfully persisted into the database, these foreign key constraints must be taken into account. Firstly all of the CaseObjects are stored in a Set at runtime. Beginning with this set of CaseObjects[1] and then the CaseAttributes belonging to this CaseObject will be put in the batches, executed and then the batch will be cleared. After each CaseObject (along with the CaseAttributes) batch is executed, it will be committed to the database. This can be seen in the following log output.
2021-07-29T13:58:25,832 DEBUG			[main]:	DB Commit successful
2021-07-29T13:58:25,837	DEBUG			[main]:	CaseObject Insert statement added to the batch: INSERT INTO compass_statistics.caseobject (CASEOBJECT_HJID, CASEOBJECT_ADDED_BY_POSREQUEST,...
2021-07-29T13:58:25,838	DEBUG			[main]:	Insert statement CaseAttribute added to the batch: INSERT INTO compass_statistics.caseattribute (CASEATTRIBUTE_HJID, ...
2021-07-29T13:58:25,838	DEBUG			[main]:	Insert statement CaseAttribute added to the batch: INSERT INTO compass_statistics.caseattribute (CASEATTRIBUTE_HJID, ...
2021-07-29T13:58:25,838	DEBUG			[main]:	Insert statement CaseAttribute added to the batch: INSERT INTO compass_statistics.caseattribute (CASEATTRIBUTE_HJID, ...
2021-07-29T13:58:25,842	DEBUG			[main]:	DB Commit successful
The batches will be frequently committed, as we have witnessed during the development process that this improves the performance of the StaR.
Figure 5 illustrates this process:
After all of the CaseObjects are persisted into the database, case specific and result specific elements are persisted into the database. Case specific elements are the relationships between CaseObjects, and they are written into the CaseObject_CaseObject join table. Result specific elements are complex and are persisted in a certain order. Figure 5 illustrates how result specific elements are persisted into the database and their order;
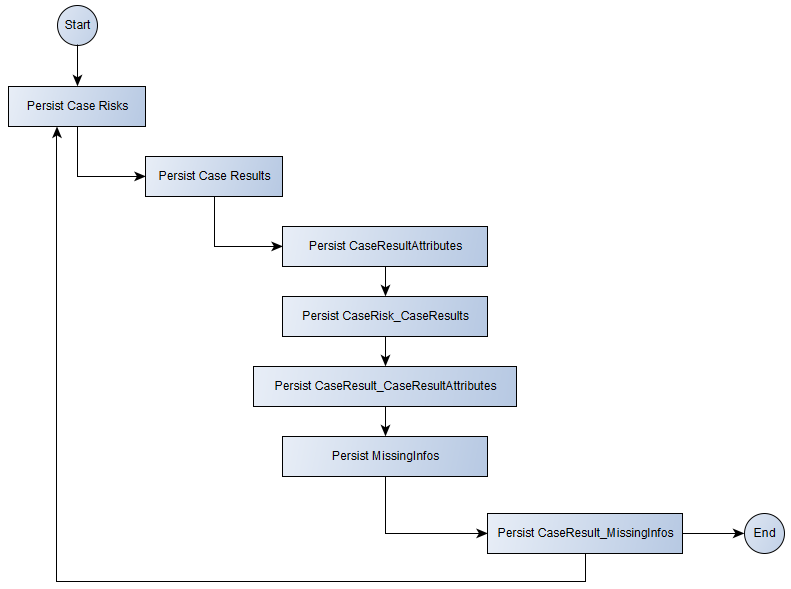
As per the previous data structure example in Figure 3, the created data structures here likewise consist of nested classes. It can easily be seen that CaseRisks contain CaseResults and CaseResults contain CaseResultAttributes. It is also important to note that first data tables according to their nested order and then join tables are persisted in the database.
Installation, configuration and call of the application
StaR comes with COMPASS and relies on a working COMPASS installation.
Requirements
-
Working COMPASS installation
-
Oracle Java 1.8 or higher
-
dedicated database schema
Configuration
The directory <path-to-compass>/config/statisticalmodule contains one configuration file: statisticalmodule.properties
The entries in this file configure the target database that is used by StaR to store the data extracted from the COMPASS system.
The following entries in the file are required:
hibernate.hbm2ddl.auto=create
hibernate.dialect=org.hibernate.dialect.MariaDB103Dialect
hibernate.connection.driver_class=org.mariadb.jdbc.Driver
hibernate.connection.username=root
hibernate.connection.password=root
hibernate.target.url=jdbc:mariadb://localhost:3307/target_db
hibernate.target.schema=COMPASS
hibernate.show_sql=false
data.encoding=ISO8859-1
According to the designated target DBMS the configuration must be adapted to that environment.
Depending on your requirements a decision regarding the creation of the target db tables must be made. The default behaviour when creating the target tables is triggered by the option “hibernate.hbm2ddl.auto=<value>”.
Seven possible values may be set:
-
none: no action will be performed.
-
create: creates the schema, destroying previous data and tables
-
create-only: database creation will be generated.
-
create-drop: Drop the schema and recreate it on SessionFactory start-up. Additionally, drop the schema on SessionFactory shutdown.
-
drop: database dropping will be generated.
-
validate: validates the schema, makes no changes to the database.
-
update: updates the schema.
Setting this to update induces the following behaviour:
-
If no tables exist (i.e.: first run of the tool), the tool will create all tables
-
If tables exist, the tool will verify the correctness and may fire DDL statements such as “alter”. Further table rows will be added to the existing rows in the tables. Make sure to remove old rows if required! See parameter
deleteDatain chapter 4.3.
Setting this to create induces the following behaviour:
-
All existing tables are dropped, and new tables are created. These tables are filled with the statistical data.
The DB specific DDL can be copied over from the tools output (console, logfile). Gen Re does not provide DB specific support regarding DDL issues nor provide a DDL for the DBMS.
The option hibernate.dialect specifies the dialect to be used by StaR when writing extracted data to the target database. The entry must match your target database system i.e. when you use Oracle9i please use the corresponding Oracle9i dialect. Following are the dialects of most common databases in the market;
DB2Dialect |
org.hibernate.dialect.DB2Dialect |
DB2390Dialect |
org.hibernate.dialect.DB2390Dialect |
DB2390V8Dialect |
org.hibernate.dialect.DB2390V8Dialect |
DB297Dialect |
org.hibernate.dialect.DB297Dialect |
DB2400Dialect |
org.hibernate.dialect.DB2400Dialect |
DB2400V7R3Dialect |
org.hibernate.dialect.DB2400V7R3Dialect |
PostgresPlusDialect |
org.hibernate.dialect.PostgresPlusDialect |
PostgreSQL10Dialect |
org.hibernate.dialect.PostgreSQL10Dialect |
PostgreSQL81Dialect |
org.hibernate.dialect.PostgreSQL81Dialect |
PostgreSQL82Dialect |
org.hibernate.dialect.PostgreSQL82Dialect |
PostgreSQL91Dialect |
org.hibernate.dialect.PostgreSQL91Dialect |
PostgreSQL92Dialect |
org.hibernate.dialect.PostgreSQL92Dialect |
PostgreSQL93Dialect |
org.hibernate.dialect.PostgreSQL93Dialect |
PostgreSQL94Dialect |
org.hibernate.dialect.PostgreSQL94Dialect |
PostgreSQL95Dialect |
org.hibernate.dialect.PostgreSQL95Dialect |
PostgreSQL9Dialect |
org.hibernate.dialect.PostgreSQL9Dialect |
Oracle8iDialect |
org.hibernate.dialect.Oracle8iDialect |
Oracle9iDialect |
org.hibernate.dialect.Oracle9iDialect |
Oracle10gDialect |
org.hibernate.dialect.Oracle10gDialect |
Oracle12cDialect |
org.hibernate.dialect.Oracle12cDialect |
MySQL55Dialect |
org.hibernate.dialect.MySQL55Dialect |
MySQL57Dialect |
org.hibernate.dialect.MySQL57Dialect |
MySQL57InnoDBDialect |
org.hibernate.dialect.MySQL57InnoDBDialect |
MySQL5Dialect |
org.hibernate.dialect.MySQL5Dialect |
MySQL5InnoDBDialect |
org.hibernate.dialect.MySQL5InnoDBDialect |
MySQL8Dialect |
org.hibernate.dialect.MySQL8Dialect |
MySQLDialect |
org.hibernate.dialect.MySQLDialect |
MySQLInnoDBDialect |
org.hibernate.dialect.MySQLInnoDBDialect |
MySQLMyISAMDialect |
org.hibernate.dialect.MySQLMyISAMDialect |
SQLServerDialect |
org.hibernate.dialect.SQLServerDialect |
SQLServer2005Dialect |
org.hibernate.dialect.SQLServer2005Dialect |
SQLServer2008Dialect |
org.hibernate.dialect.SQLServer2008Dialect |
SQLServer2012Dialect |
org.hibernate.dialect.SQLServer2012Dialect |
For further dialects supported by Hibernate 5.4 see chapter 9.
The option hibernate.connection.driver_class=com.mydatabase.Driver specifies the JDBC driver class for the target database.
If you use the same database that is used by COMPASS you can copy & paste the entry value from the COMPASS configuration file:
<path-to-compass>/config/server/compass.properties
In all other cases please refer to the documentation of the database system vendor.
The options hibernate.connection.username and hibernate.connection.password should be filled with the username and password for the database user. The user must have the following access rights for the designated target database/schema: Schema level: drop, alter, and create tables Table level: all rights to insert, update and alter data
The option hibernate.target.url is required for connecting to the database and also persisting the entries into there.
The option hibernate.target.schema has a relationship with the hibernate.target.url. This option is not required to be placed in the properties data. The name of the target database to be created by StaR is determined by this property. This option is recommended to be set however if it is not set then the target database will be determined by the option hibernate.target.url.
The option hibernate.connection.url specifies the JDBC connection string for the target database.
If you use the same database that is used by COMPASS you can copy & paste the entry value from the COMPASS configuration file:
<path-to-compass>/config/server/compass.properties. When StaR is run, it will firstly access this data
The option data.encoding refers to the encoding of the CaseData and ResultData XML interfaces. It is an optional field however in the provided section above, it can be seen that it is set to the value of ISO8859-1. Generally the parsed XML interfaces is of Unicode format and in such cases the encoding does not need to be set explicitly and can be left blank, however for the format ISO8859-1 it must be set to this value otherwise an exception will be thrown at runtime.
Technically StaR uses the Object Relational Mapping (ORM) tool named Hibernate[2] and also JDBC[3]. For a more detailed explanation of the properties please refer to the product documentation.
The logging of StaR is configured using the file
<path-to-compass>/config/log/Starlog4j2.xml
The configuration can be changed but comes with a useful default configuration.
For possible modifications please refer to the log4j – documentation.
Calling the application
To start StaR there are two recommended approaches:
-
Use the file “startStatisticalModule.bat” which is located in the /bin – folder of the COMPASS installation. The file must reside in the COMPASS installations /bin directory to work properly.
-
Instrument the application from an external script or scheduled task (cronjob). The specific JAVA VM call can be copied from the above mentioned “
startStatisticalModule.bat”
During its execution StaR creates various tables and stores statistically relevant data in these tables.
Call - Parameters:
Upon calling the application the compass.properties
Mandatory parameters:
-systemids
the system id parameter, refers to the source schema where case and result datas are contained. The case and results are found in the tables c40_casedata and c40_resultdata[4].
-subsystems
the subsystem id parameter.[5]
Example of mandatory parameters:
-subsystems subsystem -systemids prod1
Please note that only one system id and subsystem id can be provided when calling the application.
Optional parameters:
-properties
path to an alternative database configuration property file
(default value: ./config/statisticalmodule/statisticalmodule.properties)
-cleartargetdb {true|false}
TRUE forces the creation of new tables. In this case a DROP DATABASE <db_name> statement is executed. The existing database will be dropped and a new one along with the tables is created. Default is FALSE. Do not use this parameter unless required.
-deleteData {true|false}
TRUE forces the deletion of all data in all tables but does not change the table structure and/or recreate the
database/schema. Default is FALSE, which implies that data that may be converted during a previous run of the tool
will not be deleted. If this parameter is set true, a series of
DELETE FROM db_table statements are executed and the existing entries will be removed from the database tables.
Note that this parameter is overshadowed by the parameter cleartargetdb. If it is set to true, this parameter will then be ignored.
-acceptEmptyResult
accepts cases with empty results. Default value is false. This parameter is incompatible with the parameters dateBegin and dateEnd, which are based on the AssessmentDate in the result-XML.
-dateBegin
Optional parameter: Specifying a begin date in order to reduce the number of processed applications.
Date format: yyyyMMdd, e.g.: 20161231
-dateEnd
Optional parameter: Specifying an end date in order to reduce the number of processed applications.
Date format: yyyyMMdd, e.g.: 20180101
Example of mandatory and optional parameters:
-logconfig c:/demo/log4j.xml /opt/demo/log4j.xml -deleteData true -properties c:/demo/myproperties.txt /opt/demo/myproperties.properties
-subsystems sub1 -systemids prod1 -writexml
VM options:
-logconfig
path to an alternative log4j xml configuration file
(default value: ./config/log/statisticalmodulelog4j.xml)
Querying statistical data
After a successful execution of StaR, the target database schema is filled with the data created from the COMPASS system(s). Queries to the database are made using SQL statements that are executed on the database. The resulting data sets can be used in Microsoft Excel or one of the various BI tools available. BI tools like QlikView come with the possibility to design, store and execute the SQL statements within the tool. Afterwards the data can be filtered, sorted and visualized in QlikView.
Table reference
The data structure used by StaR resembles the COMPASS Input Interface and the COMPASS Result interface.
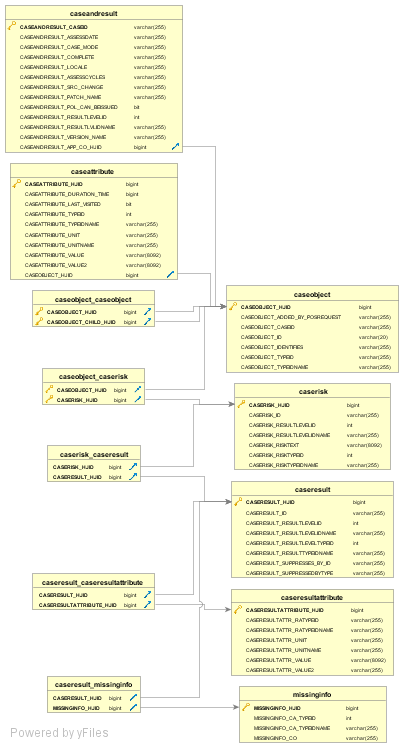
Data tables:
CASEANDRESULT
CASEATTRIBUTE
CASEOBJECT
CASERESULT
CASERESULTATTRIBUTE
CASERISK
MISSINGINFO
Join tables:
CASEOBJECT_CASEOBJECT
CASEOBJECT_CASERISK
CASERESULT_CASERESULTATT
CASERESULT_MISSINGINFO
CASERISK_CASERESULT
Since only assessed cases are inspected by StaR some information from both the Case-XML element and Result-XML element are merged into one table called “CASEANDRESULT”. The table contains the following fields:
CASEANDRESULT_CASEID             varchar(255)
CASEANDRESULT_ASSESSDATE         varchar(255)
CASEANDRESULT_CASE_MODE          varchar(255)
CASEANDRESULT_COMPLETE           varchar(255)
CASEANDRESULT_LOCALE             varchar(255)
CASEANDRESULT_ASSESSCYCLES   	 varchar(255)
CASEANDRESULT_SRC_CHANGE     	 int(11)
CASEANDRESULT_PATCH_NAME         varchar(255)
CASEANDRESULT_POL_CAN_BEISSUED   varchar(255)
CASEANDRESULT_RESULTLEVELID      int(11)
CASEANDRESULT_RESULTLVLIDNAME    varchar(255)
CASEANDRESULT_VERSION_NAME       varchar(255)
CASEANDRESULT_APP_CO_HJID        bigint(20)
Every case that has been assessed leads to an entry in this table. Many basic queries to the system can be done with this table. For instance you could:
-
Count the overall number of cases in the system:
SELECT count(*) FROM CASEANDRESULT;
-
Retrieve all “resultlevelidname” entries and create a chart that shows the assessment results on application level:
SELECT CASEANDRESULT_RESULTLVLIDNAME FROM CASEANDRESULT;
In general, every xml element of the case/result xml will be mapped into a specific table. Every xml attribute will be mapped as a column of a table.
  <CaseObject Id="17" TypeId="24" TypeIdName="Doctor">
    <CaseAttribute TypeId="44" TypeIdName="name">
      <CaseAttributeValue>
        <StringValue Value="Doctor One"/>
      </CaseAttributeValue>
    </CaseAttribute>
    <CaseAttribute TypeId="251" TypeIdName="street">
      <CaseAttributeValue Source="2">
        <StringValue Value="1, Elm Street"/>
      </CaseAttributeValue>
    </CaseAttribute>
  </CaseObject>
The xml element CaseObject leads to this entry in the table CASEOBJECT:
| CASEOBJECT_HJID | addedByPOSRequest | caseId | CASEOBJECT_ID | identifies | CASEOBJECT_TYPEID | CASEOBJECT_TYPEIDNAME |
|---|---|---|---|---|---|---|
7 |
(null) |
Star_Case_123 |
17 |
(null) |
24 |
Doctor |
The first field is an automatically generated id. The other fields represent the xml attributes of the CaseObject.
The nested CaseAttribute elements can be found in the table “CASEATTRIBUTE”. (In order to keep the example readable the columns “CASEATTRIBUTE_UNIT” and “unitName” are not shown in the table.)
| CASEATTRIBUTE_HJID | CASEATTRIBUTE_TYPEID | CASEATTRIBUTE_TYPEIDNAME | CASEATTRIBUTE_VALUE | CASEATTRIBUTE_VALUE2 | CASEOBJECT_HJID | CASEATTRIBUTE_DURATION | CASEATTRIBUTE_LAST_VISITED |
|---|---|---|---|---|---|---|---|
68 |
44 |
name |
Doctor One |
(null) |
7 |
11013 |
true |
67 |
251 |
street |
1, Elm Street |
(null) |
7 |
12114 |
false |
Both tables must be joined using the field “CASEOBJECT_HJID” in the table “CASEATTRIBUTE” and the field “CASEOBJECT_HJID” in the table “CASEOBJECT”. The example above shows that both entries ‘belong’ to the CaseObject with the Primary Key (PK) 7.
Changes in Data Column Mappings
We have mentioned previously that we have changed table structures and column mappings. There were several purposes for these structural changes. These can be outlined as filtering out insignificant data, preventing loss of information and achieving an easier to understand database column – data attribute mapping.
One of the most important improvements in the new StaR system is that the empty CaseAttributes are filtered out and not persisted in the target database.
<CaseAttribute TypeId="9" TypeIdName="Period">
	<CaseAttributeValue Source="2"/>
</CaseAttribute>
The this empty CaseAttribute Period can be provided as an example. Even though there is a CaseAttributeValue available within the CaseAttribute, it can be ignored as it only contains Source information and no significant values.
We have also introduced several new changes in data persistence scheme. For instance, consider the following CaseAttributeType.
<CaseAttribute TypeId="37" TypeIdName="Eintrittsalter für Untersuchungsgrenzen">
<CaseAttributeValue>
		<SingleValue UnitName="Jahr(e)" Value="33.0" Unit="16"/>
	</CaseAttributeValue>
</CaseAttribute>
In the old StaR creates the following entry for this CaseAttribute.
| CASEATTRIBUTE_TYPEID | CASEATTRIBUTE_TYPEIDNAME | CASEATTRIBUTE_UNIT | unitName | CASEATTRIBUTE_VALUE | CASEATTRIBUTE_value2 |
|---|---|---|---|---|---|
37 |
Eintrittsalter für Untersuchungsgrenzen |
Jahr(e) |
null |
33.0 |
null |
It can be easily inferred that there are inconsistencies in the column names, firstly we updated the column names so that they are all written entirely in capital letters, furthermore we also changed how the attribute values are mapped to the columns.
The new StaR creates the following entry for the given CaseAttribute.
| CASEATTRIBUTE_TYPEID | CASEATTRIBUTE_TYPEIDNAME | CASEATTRIBUTE_UNIT | CASEATTRIBUTE_UNITNAME | CASEATTRIBUTE_VALUE | CASEATTRIBUTE_VALUE2 |
|---|---|---|---|---|---|
37 |
Eintrittsalter für Untersuchungsgrenzen |
16 |
Jahr(e) |
33.0 |
All of the SingleValue attribute values are now mapped to the corresponding columns with the same names and thus persisted in the target database. The column mappings have now become clearer and do not lead to confusions.
A similar improvement regarding the CaseResultAttributes was also implemented. The following CaseResultAttribute can be provided as an example;
<CaseResultAttribute ResultAttributeTypeIdName="Zuschlagshöhe in Promille" ResultAttributeTypeId="8">
    <AttributeValue>
        <SingleValue UnitName="%" Value="50.0" Unit="9"/>
    </AttributeValue>
</CaseResultAttribute>
This CaseResultAttribute was persisted by the old StaR in the target database as follows;
| CASERESULTATTRIBUTE_HJID | CASERESULTATT_RATYPEID | CASERESULTATT_RATYPEIDNAME | CASERESULTATTRIBUTE_UNIT | CASERESULTATTRIBUTE_VALUE | CASERESULTATTRIBUTE_UNIT2 |
|---|---|---|---|---|---|
63 |
8 |
Zuschlagshöhe in Promille |
% |
50.0 |
(null) |
The new StaR persists this CaseResultAttribute in the target database as follows;
| CASERESULTATTRIBUTE_HJID | CASERESULTATTR_RATYPEID | CASERESULTATTR_RATYPEIDNAME | CASERESULTATTR_UNIT | CASERESULTATTR_VALUE | CASERESULTATTR_UNITNAME |
|---|---|---|---|---|---|
1007 |
8 |
Zuschlagshöhe in Promille |
% |
50.0 |
% |
There were two improvements made here; firstly, the column CASERESULTATTRIBUTE_UNIT2 was renamed to CASERESULTATTRIBUTE_VALUE2. Furthermore, as in the following case of CaseAttributes, the attribute values were mapped to the columns accordingly.
Another example to the improved column mappings scheme in new StaR can be provided by the PeriodValues.
<CaseAttribute TypeId="9" TypeIdName="Zeitraum">
	<CaseAttributeValue Source="2">
		<PeriodValue>
			<DateFrom>
				<DateValue Year="2002" Day="2" Month="2"/>
			</DateFrom>
			<DateTo>
				<DateValue Year="2002" Day="2" Month="5"/>
			</DateTo>
			<Duration>
				<SingleValue UnitName="Monat(e)" Value="3.0" Unit="5"/>
			</Duration>
		</PeriodValue>
	</CaseAttributeValue>
</CaseAttribute>
This PeriodValue is persisted by the old StaR in the target database as follows;
| CASEATTRIBUTE_TYPEID | CASEATTRIBUTE_TYPEIDNAME | CASEATTRIBUTE_UNIT | unitName | CASEATTRIBUTE_VALUE | CASEATTRIBUTE_value2 |
|---|---|---|---|---|---|
9 |
Zeitraum |
period |
null |
Null |
null |
It can be seen that none of the provided Date and Duration values were written to the database, this might indicate a loss of important data. This issue was solved in the new StaR and all of the provided Date and Duration values are now persisted into the target database.
| CASEATTRIBUTE_TYPEID | CASEATTRIBUTE_TYPEIDNAME | CASEATTRIBUTE_UNIT | CASEATTRIBUTE_UNITNAME | CASEATTRIBUTE_VALUE | CASEATTRIBUTE_VALUE2 |
|---|---|---|---|---|---|
9 |
Zeitraum |
period |
2.2.2002;3.0;Monat(e) |
null |
The display format is <dd.mm.YYYY;dd.mm.YYYY;value;UnitName>.
The value of the column CASEATTRIBUTE_UNIT is always set to period.
A new feature was added related to several specific CaseObject elements and their CaseObjectRelations. In two specific cases new child-parent relationships are defined.
One of these cases occurs when a CaseObject with Disease Consolidated exists in the result interface. This CaseObject is special because it is only available in the result interface and thus the new this object will now be attached as a child to the Assured Person.
| CASEOBJECT_HJID | addedByPOSRequest | caseId | CASEOBJECT_ID | identifies | CASEOBJECT_TYPEID | CASEOBJECT_TYPEIDNAME |
|---|---|---|---|---|---|---|
9 |
(null) |
Tess_NI_01_EM |
3 |
(null) |
27 |
VP |
23 |
(null) |
Tess_NI_01_EM |
1021 |
(null) |
33 |
Erkrankung konsolidiert |
As it can be seen, these CaseObjects are identified with assigned hjid’s 9 and 23 respectively. Now an entry in the caseobject_caseobject table exists with these hjid’s.
| CASEOBJECT_HJID | CASEOBJECT_CHILD_HJID |
|---|---|
9 |
23 |
The other scenario is more specific; it indicates that if CaseObjects of type Disease and Disease Consolidated are both available in the result interface and in the RiskCaseObjectRelations, then a new child-parent relationship is defined between them. In the following table, we see that both case objects exist in the input interface with id Tess_NI_01_EM. These case objects are identified with the assigned hjid’s 13 and 23.
| CASEOBJECT_HJID | addedByPOSRequest | caseId | CASEOBJECT_ID | identifies | CASEOBJECT_TYPEID | CASEOBJECT_TYPEIDNAME |
|---|---|---|---|---|---|---|
13 |
(null) |
Tess_NI_01_EM |
13 |
(null) |
8 |
Erkrankung |
23 |
(null) |
Tess_NI_01_EM |
1021 |
(null) |
33 |
Erkrankung konsolidiert |
In the caseobject_caseobject table, now a parent-child relationship is available between these two case objects.
| CASEOBJECT_HJID | CASEOBJECT_CHILD_HJID |
|---|---|
13 |
23 |
Data Migration Hints
In general, it is recommended to drop existing tables and then let StaR generate the new tables and data, however there might be cases where it is desired to keep existing data and migrate them into the new tables generated by the StaR.
The general rule of thumb is to change the table structures and make column names of the old tables to match exactly with the column names of the new tables to enable a smooth data migration. We have already stated the data structures of the new tables in section 5.1. Here is the CASEANDRESULT table generated by the old StaR;
CASEID, varchar
ASSESSMENTDATE, datetime
caseMode, varchar
complete, tinyint
locale, varchar
numberOfChangeAssessCycles, varchar
numberOfSourceChanges, int
patchName, varchar
POLICYCANBEISSUED, tinyint
CAR_RESULTLEVELID	, int
CAR_RESULTLEVELIDNAME, varchar
versionName, varchar
application_CASEOBJECT_HJID, bigint
When compared with the new tables, it can easily be seen that there are significant changes in the column names, firstly in the new StaR, the column names were made consistent and written all in capital letters with underscores in between, however the column names of the old tables were inconsistent. In this specific case where we want to migrate the data from the old CASEANDRESULT table to the new one, the following SQL Query must be executed;
ALTER TABLE `compass_stats`.`caseandresult`
  CHANGE `caseid` CASEANDRESULT_CASEID VARCHAR(255) NOT NULL;

ALTER TABLE `compass_stats`.`caseandresult`
  CHANGE `assessmentdate` CASEANDRESULT_ASSESSDATE VARCHAR(255);

ALTER TABLE `compass_stats`.`caseandresult`
  CHANGE `casemode` CASEANDRESULT_CASE_MODE VARCHAR(255);

ALTER TABLE `compass_stats`.`caseandresult`
  CHANGE `complete` CASEANDRESULT_COMPLETE BIT(1) NOT NULL;

ALTER TABLE `compass_stats`.`caseandresult`
  CHANGE `locale` CASEANDRESULT_LOCALE VARCHAR(255);

ALTER TABLE `compass_stats`.`caseandresult`
  CHANGE `numberofchangeassesscycles`
  CASEANDRESULT_NO_ASSESSCYCLES VARCHAR(255);

ALTER TABLE `compass_stats`.`caseandresult`
  CHANGE `numberofsourcechanges` CASEANDRESULT_NO_SRC_CHANGE INT
  NOT NULL;

ALTER TABLE `compass_stats`.`caseandresult`
  CHANGE `patchname` CASEANDRESULT_PATCH_NAME VARCHAR(255);

ALTER TABLE `compass_stats`.`caseandresult`
  CHANGE `policycanbeissued` CASEANDRESULT_POL_CAN_BEISSUED BIT(1);

ALTER TABLE `compass_stats`.`caseandresult`
  CHANGE `car_resultlevelid` CASEANDRESULT_RESULTLEVELID INT;

ALTER TABLE `compass_stats`.`caseandresult`
  CHANGE `car_resultlevelidname` CASEANDRESULT_RESULTLVLIDNAME VARCHAR(255);

ALTER TABLE `compass_stats`.`caseandresult`
  CHANGE `versionname` CASEANDRESULT_VERSION_NAME VARCHAR(255);

ALTER TABLE `compass_stats`.`caseandresult`
  CHANGE `application_caseobject_hjid` CASEANDRESULT_APP_CO_HJID
  BIGINT
For each table a separate SQL must be created and executed, so that the table structures are completely compatible with each other. It is also important to remind that the tables explanation and explanation_caseresult were removed, therefore if these tables are existing, they must be dropped and do not need not to be created again.
After changing the table structures, the dump function can be executed to create a backup of the data. Please keep in mind that to calculate the required disk space, approximately 40 kilobytes per case and result are estimated. For instance, let us assume that we have a database namely ‘compass_stats’ and a MySQL DBMS, for creating a backup of this database, the following command can be executed;
mysqldump -uusername -ppassword --databases ‘compass_stats’ > C:\User\Desktop\compass_stats.sqlAs a result of this command an SQL script with the same name is generated on the indicated directory. If this SQL script is executed against the existing database, then we would have successfully migrated the data from existing old StaR tables to the new ones. There are several options for executing the SQL script, either the script can be executed over the CLI of the DBMS or a database visualizer tool can be employed, another option is to create a batch file for the execution of the script. The preferred manner is up to the choice of the operator.
Finally, please refer to the corresponding database dump function of the preferred system of choice when creating a backup, the new StaR employs Hibernate 5.4.20.Final for generating the tables, in the ongoing sections we have enlisted the compatible dialects.
Sample SQL queries
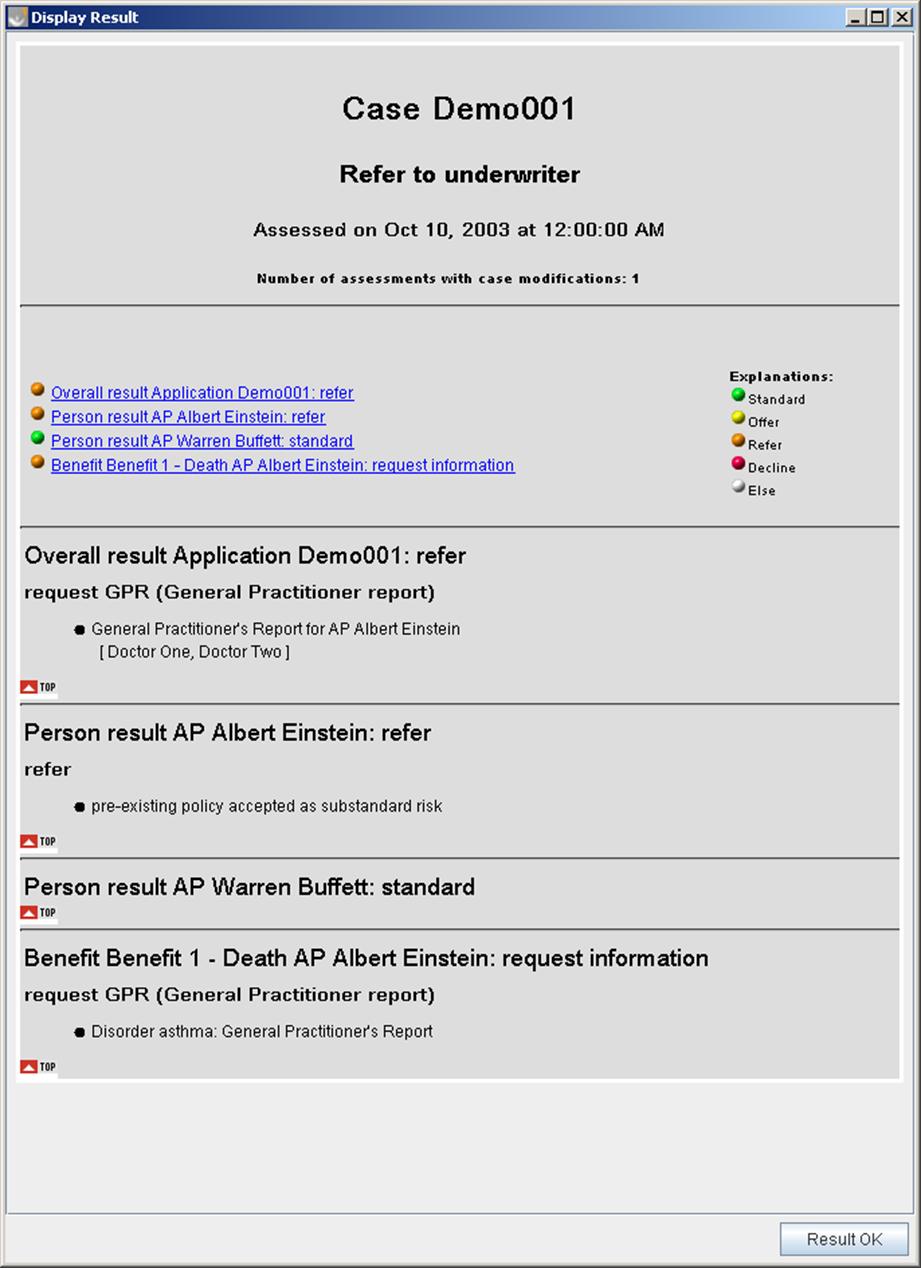
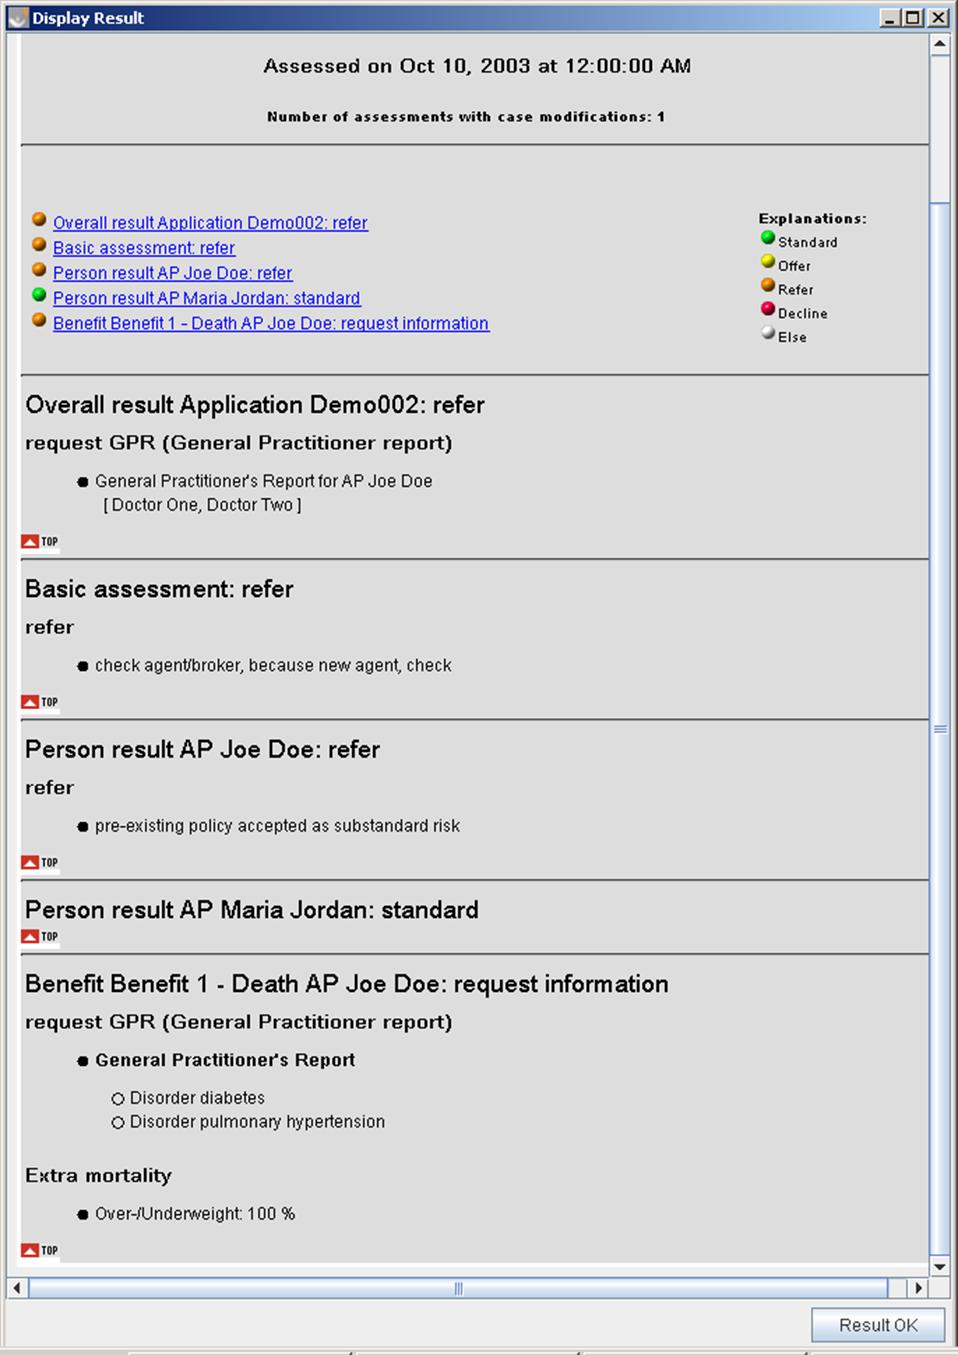
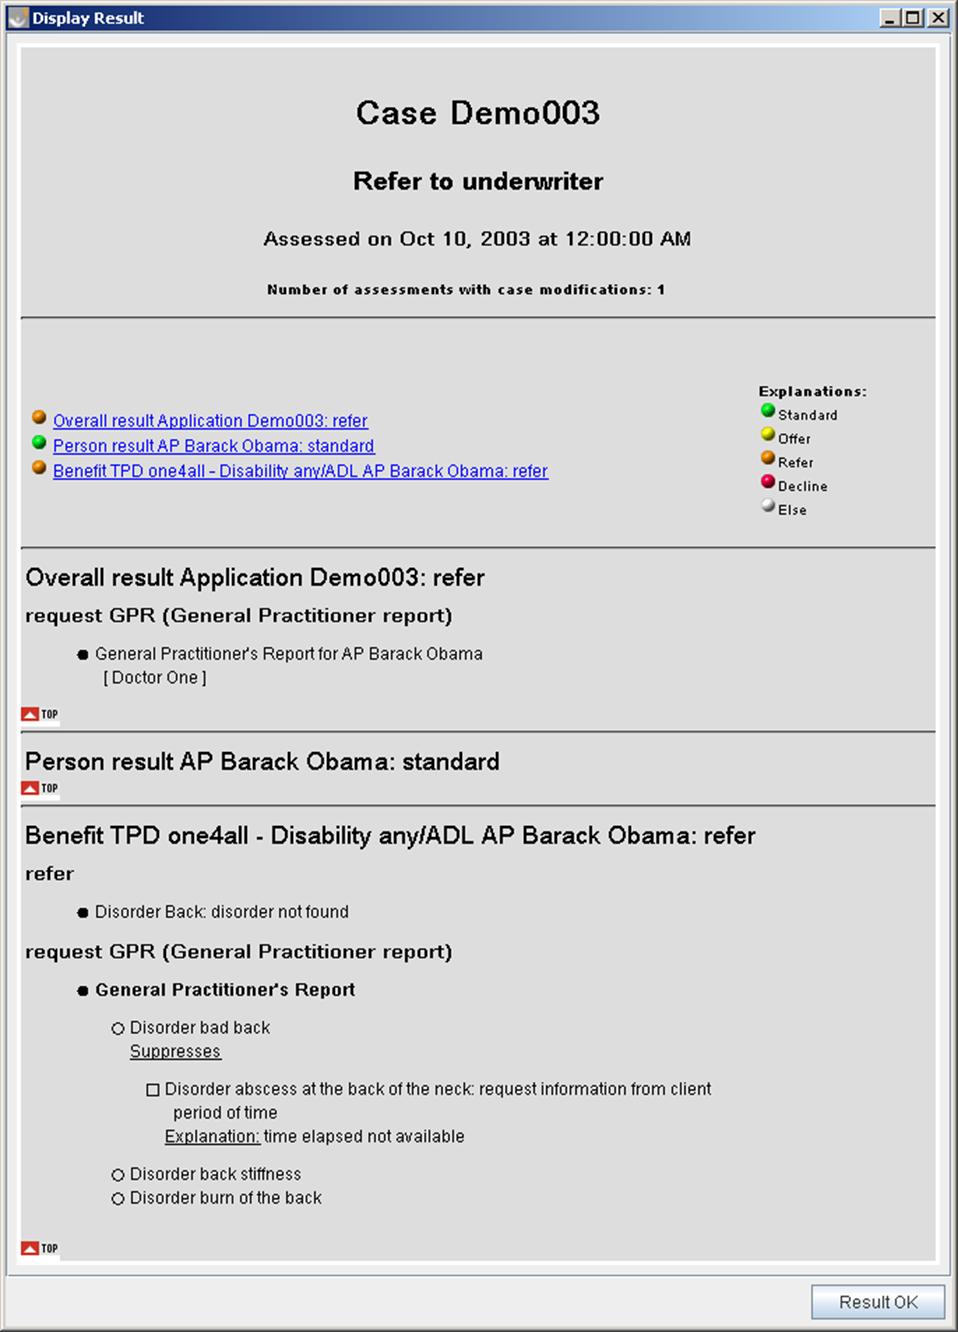
Most of the examples are built around a demo COMPASS system with three demo cases in it. The results of all three cases can be found as screenshots at the end of the document. This documentation comes with several Microsoft Excel Workbooks that contain the raw data, a pivot table and a chart that visualizes the pivot table.
Basic queries
SELECT * FROM caseandresult;In case of a MySQL database the resulting data looks like this, if there are three cases in the database:
1 |
2003-10-10 00:00:00 |
HeadOffice |
true |
Demo001 |
en |
35 |
false |
5 |
refer |
1 |
2 |
2003-10-10 00:00:00 |
HeadOffice |
true |
Demo003 |
en |
46 |
false |
5 |
refer |
22 |
3 |
2003-10-10 00:00:00 |
HeadOffice |
true |
Demo002 |
en |
9 |
false |
5 |
refer |
38 |
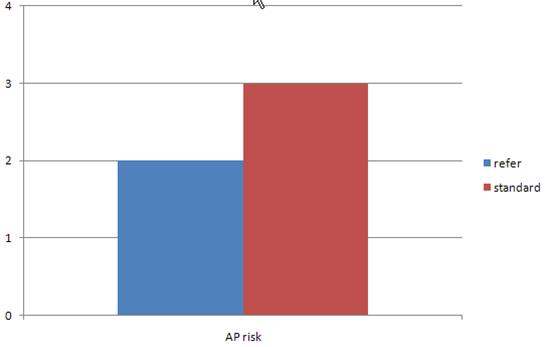
Results for AP
The objective is to determine which results are associated with Assured Persons (AP). The AP information is wrapped into a “CaseObject”. Therefore we need to select data from the “caseobject” – table. Furthermore we need the result for the AP. This information is stored in the table named “caserisk”. The relation between these tables is determined by the M:N join-table “caseobject_caserisk”. Since the “caseobject” – table contains not just AP related information we have two options:
-
Introduce a “where” – clause that filters all non-AP entries
-
Fetch all entries and filter out the non-AP entries in the BI tool
The final SQL for the first option can look like this:
SELECT DISTINCT
    caserisk.*,
    caseobject.*
FROM
    CASEOBJECT,
    CASERISK,
    CASEOBJECT_CASERISK
WHERE
    CASEOBJECT_TYPEID = "27"
AND caseobject_caserisk.CASEOBJECT_HJID = caseobject.CASEOBJECT_HJID
AND caseobject_caserisk.CASERISK_HJID = caserisk.CASERISK_HJID
In the “where” – clause we limit the results to entries that have the CASEOBJECT_TYPEID = “27”. This typeid marks AP objects.
To implement the second option, simply leave out the “where” – clause that puts a constraint on the CASEOBJECT_TYPEID. The resulting data must be filtered to only show AP relevant entries. This can easily be done in Excel using the standard filters.
This example can be found in the Excel Workbook file named “AP_Results.xls”.
Results for AP with disorder(s)
To retrieve all AP results and their disorders the following statement can be used.
SELECT DISTINCT
    caserisk.*,
    caseobject.*,
    caseresult.*
FROM
    CASEOBJECT,
    CASERISK,
    CASEOBJECT_CASERISK,
    CASERESULT,
    CASERISK_CASERESULT
WHERE
    CASEOBJECT_TYPEID = "27"
AND caseobject_caserisk.CASEOBJECT_HJID = caseobject.CASEOBJECT_HJID
AND caseobject_caserisk.CASERISK_HJID = caserisk.CASERISK_HJID
AND caseresult.CASERESULT_HJID = caserisk_caseresult.CASERESULT_HJID
AND caserisk.CASERISK_HJID = caserisk_caseresult.CASERISK_HJID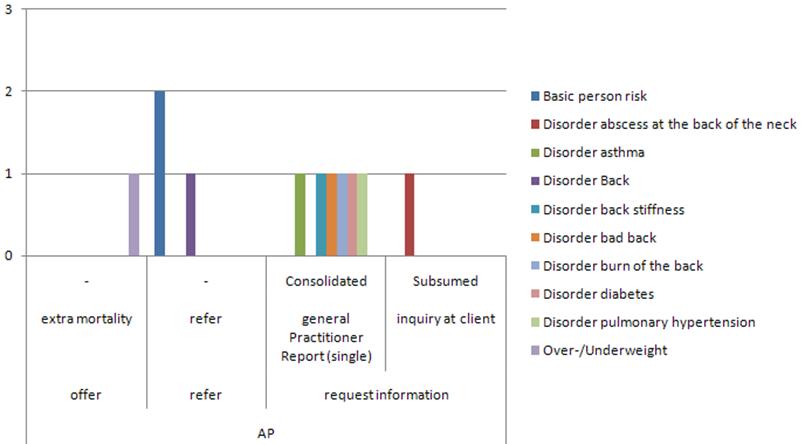
This example can be found in the Excel Workbook file named “AP_with_disorders.xls”
Results and loadings broken down to the tariff (benefit)
SELECT
    *
FROM
    CASERESULT,
    CASERISK,
    CASERISK_CASERESULT,
    CASEOBJECT          		AS co,
    CASEOBJECT_CASERISK   AS co_cr,
    CASEATTRIBUTE
WHERE
    caserisk_caseresult.CASERISK_HJID = caserisk.CASERISK_HJID
AND caserisk_caseresult.caseResult_HJID = caseresult.caseResult_HJID
AND co.CASEOBJECT_HJID = co_cr.CASEOBJECT_HJID
AND caserisk.CASERISK_HJID = co_cr.caseRisk_HJID
AND co.CASEOBJECT_TYPEID = "0"
AND caseattribute.CASEOBJECT_HJID = co.CASEOBJECT_HJID
AND caseattribute.CASEATTRIBUTE_TYPEID = 11
Number of AP with exclusion clause broken down to tariff level
SELECT DISTINCT
    caserisk.*,
    caseobject.*,
    caseresult.*,
    caseresultattribute.*
FROM
    CASEOBJECT,
    CASERISK,
    CASEOBJECT_CASERISK,
    CASERESULT,
    CASERISK_CASERESULT,
    CASERESULT_CASERESULTATTRIBUTE,
    CASERESULTATTRIBUTE
WHERE
    CASEOBJECT_TYPEID = "27"
AND caseobject_caserisk.CASEOBJECT_HJID = caseobject.CASEOBJECT_HJID
AND caseobject_caserisk.CASERISK_HJID = caserisk.CASERISK_HJID
AND caseresult.CASERESULT_HJID = caserisk_caseresult.CASERESULT_HJID
AND caserisk.CASERISK_HJID = caserisk_caseresult.CASERISK_HJID
AND caseresultattribute.CASERESULTATTRIBUTE_HJID = caseresult_caseresultattribute.CASERESULTATTRIBUTE_HJID
AND caseresult_ caseresultattribute.CASERESULT_HJID = caseresult.CASERESULT_HJID
Result Report
This report incorporates the tariffs and their resultlevels.
SELECT
    caserisk.*,
    caseobject.*,
    caseattribute.*
FROM
    CASERISK,
    CASEOBJECT,
    CASEOBJECT_CASERISK,
    CASEATTRIBUTE
WHERE
    caserisk.CASERISK_RISKTYPEID = "36"
AND caseobject.CASEOBJECT_HJID = caseobject_caserisk.CASEOBJECT_HJID
AND caserisk.CASERISK_HJID = caseobject_caserisk.CASERISK_HJID
AND caseobject.CASEOBJECT_TYPEID = "0"
AND caseattribute.CASEOBJECT_HJID = caseobject.CASEOBJECT_HJID
AND caseattribute.CASEATTRIBUTE_TYPEID = "11"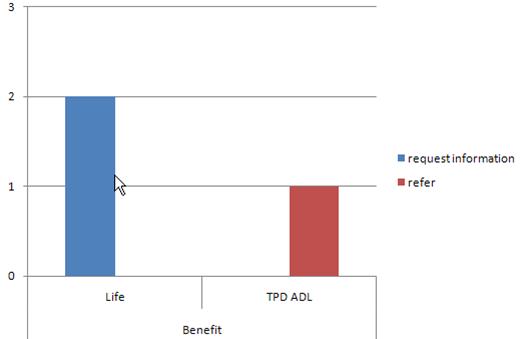
Requested information on application level
This report shows the requested information on application level. In the example below are many occurrences of consolidated and subsumed GPR’s. On application level three GPR’s were finally requested.
SELECT
    caseobject.CASEOBJECT_TYPEIDNAME,
    caserisk.*,
    caseresult.CASERESULT_RESULTTYPEIDNAME,
    caseresult.CASERESULT_SUPPRESSEDBYTYPE
FROM
    CASEOBJECT,
    CASEOBJECT_CASERISK,
    CASERISK,
    CASERISK_CASERESULT,
    CASERESULT

WHERE
    CASEOBJECT_TYPEID="25"
AND caseobject_caserisk.CASEOBJECT_HJID = caseobject.CASEOBJECT_HJID
AND caseobject_caserisk.CASERISK_HJID = caserisk.CASERISK_HJID
AND caserisk_caseresult.CASERISK_HJID = caserisk.CASERISK_HJID
AND caserisk_caseresult.CASERESULT_HJID  = caseresult.CASERESULT_HJID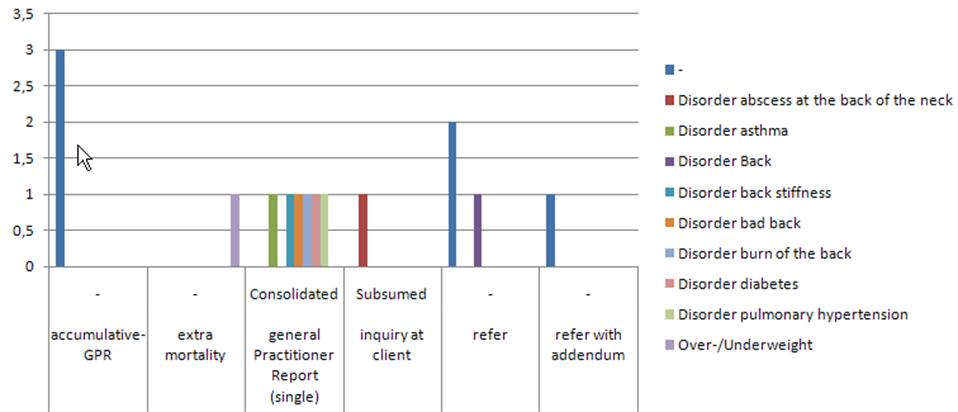
Requested information on tariff level
This report retrieves all potentially requested information for all tariffs. In this example the typeid’s of the requested information are restricted to 1 (GPR), 9 (questionnaire), 10 (medical examination) and 20 (document).
SELECT DISTINCT
    caserisk.*,
    caseobject.*,
    caseattribute.*,
    caseresultattribute.*
FROM
    CASERISK,
    CASEOBJECT,
    CASEOBJECT_CASERISK,
    CASEATTRIBUTE,
    CASERESULTATTRIBUTE,
    CASERESULT_CASERESULTATT,
    CASERESULT,
    CASERISK_CASERESULT
WHERE
    caseobject.CASEOBJECT_HJID = caseobject_caserisk.CASEOBJECT_HJID
AND caserisk.CASERISK_HJID = caseobject_caserisk.CASERISK_HJID
AND caseobject.CASEOBJECT_TYPEID = "0"
AND caseattribute.CASEOBJECT_HJID = caseobject.CASEOBJECT_HJID
AND caseattribute.CASEATTRIBUTE_TYPEID = "11"
AND caserisk.CASERISK_RESULTLEVELID = "3"
AND caseresultattribute.CASERESULTATTRIBUTE_HJID =
    CASERESULT_CASERESULTATTRIBUTE.CASERESULTATTRIBUTE_HJID
AND caseresult.CASERESULT_HJID = CASERESULT_CASERESULTATTRIBUTE.CASERESULT_HJID
AND caserisk_caseresult.CASERISK_HJID = caserisk.CASERISK_HJID
AND caserisk_caseresult.CASERESULT_HJID = caseresult.CASERESULT_HJID
AND caseresultattribute.CASERESULTATTRIBUTE_RATYPEID IN (1,9,10,20)
Terms not found in COMPASS databases
This query encompasses listings of all occupations, drugs, disorders, nationalities or pursuits which have been found in applications, but were not found in the COMPASS system.
CaseAttributeTypeIDs:
45 - Foreign travel
61 - Nationality
115 - Disorders
163 – Sport/Hobby
209 - Occupations
352 - Drugs (Medication)
-
To retrieve all the missing terms:
SELECT
    CASEATTRIBUTE.CASEATTRIBUTE_TYPEIDNAME,
    CASEATTRIBUTE.CASEATTRIBUTE_VALUE,
    CASEATTRIBUTE.CASEATTRIBUTE_VALUE2,
    CASEATTRIBUTE_TYPEID
FROM
    CASEATTRIBUTE
WHERE
    CASEATTRIBUTE_ VALUE2 IS NULL
AND CASEATTRIBUTE_TYPEID IN (45,61,115,209,163,352)
-
To retrieve missing occupations only:
SELECT
    CASEATTRIBUTE.CASEATTRIBUTE_TYPEIDNAME,
    CASEATTRIBUTE.CASEATTRIBUTE_VALUE,
    CASEATTRIBUTE.CASEATTRIBUTE_ VALUE2,
    CASEATTRIBUTE_TYPEID
FROM
    CASEATTRIBUTE
WHERE
    CASEATTRIBUTE_ VALUE2 IS NULL
AND CASEATTRIBUTE_TYPEID = 34
Tips and Tricks
Depending on the objective of a report there are several possible approaches; there isn’t just one way of doing it. It is important to exactly define what the report should incorporate. After properly defining this you should create one or more lean cases, assess them and prepare them using StaR. Afterwards create the SQL statements. Always keep in mind that you can filter out data using SQL constraints or the tool which is used to create the final reports.
If stuck when creating the SQL statement(s) you should activate the option “-writexml” when running StaR. Look at the case and the result xml files, find the pieces of information you are interested in and then try to discover which tables are needed and what JOIN operations on the tables have to be made.
The correct tools can dramatically ease this process. If your DBMS does not provide the option to easily create SQL statements or does not allow full-text searches over all table data you may evaluate tools like DbVisualizer (http://www.dbvis.com/).
While Tools like Excel may help getting started with the topic, there are more capable tools available, some at no expense:
-
Microsoft Power BI – a free solution for Windows Users from Microsoft. https://powerbi.microsoft.com
-
Qlikview – a commercial solution. http://www.qlik.com/
-
Rapidminer – a free solution. https://rapidminer.com/
Please note that Gen Re cannot assist and/or support third party software.
More information on Business Intelligence and links to more tools can be found here: https://en.wikipedia.org/wiki/Business_intelligence
Further dialects supported by Hibernate 5.4
For more information and further notes about the dialects supported by Hibernate 5.4, please visit the following website;