User Manual CaseViewerApp
Introduction
This document is intended for users who use the CaseViewerApp for data capture. It contains:
-
a description of the main screen and the functionality of the CaseViewerApp: Application overview - functionality
-
Instructions for Capturing technical data
-
Notes on Risk data entry
The chapter Application overview - functionality describes creating, copying and deleting applications. It also allows you to perform the main COMPASS operations:
-
Entering / changing application details
-
Assessing an application
-
Displaying assessment results
-
Print of the application details
The Instructions for capturing technical data (e.g. benefits applied for, sum, duration, etc.) are detailed, as this part was developed exclusively for testing and not for productive use. The screens are hardly adapted to company requirements, so that a detailed description is possible. In productive use the technical data is transferred to Compass via the COMPASS input interface.
The Notes on risk data entry are limited to general input instructions,
as all questions in an application are customised to the company-specific application forms.
These questions often have to be answered by the end customer and should therefore be self-explanatory or have instructions in the form of tooltips.
It should be emphasised here that there are application forms for risk data capture that require capture in accordance with
ScreenBuilder protocol 1 or 2 (hereinafter SB1 and SB2). The presentation and use are considered separately.
Application overview - functionality
After calling up the CaseViewerApp, the following image is displayed:
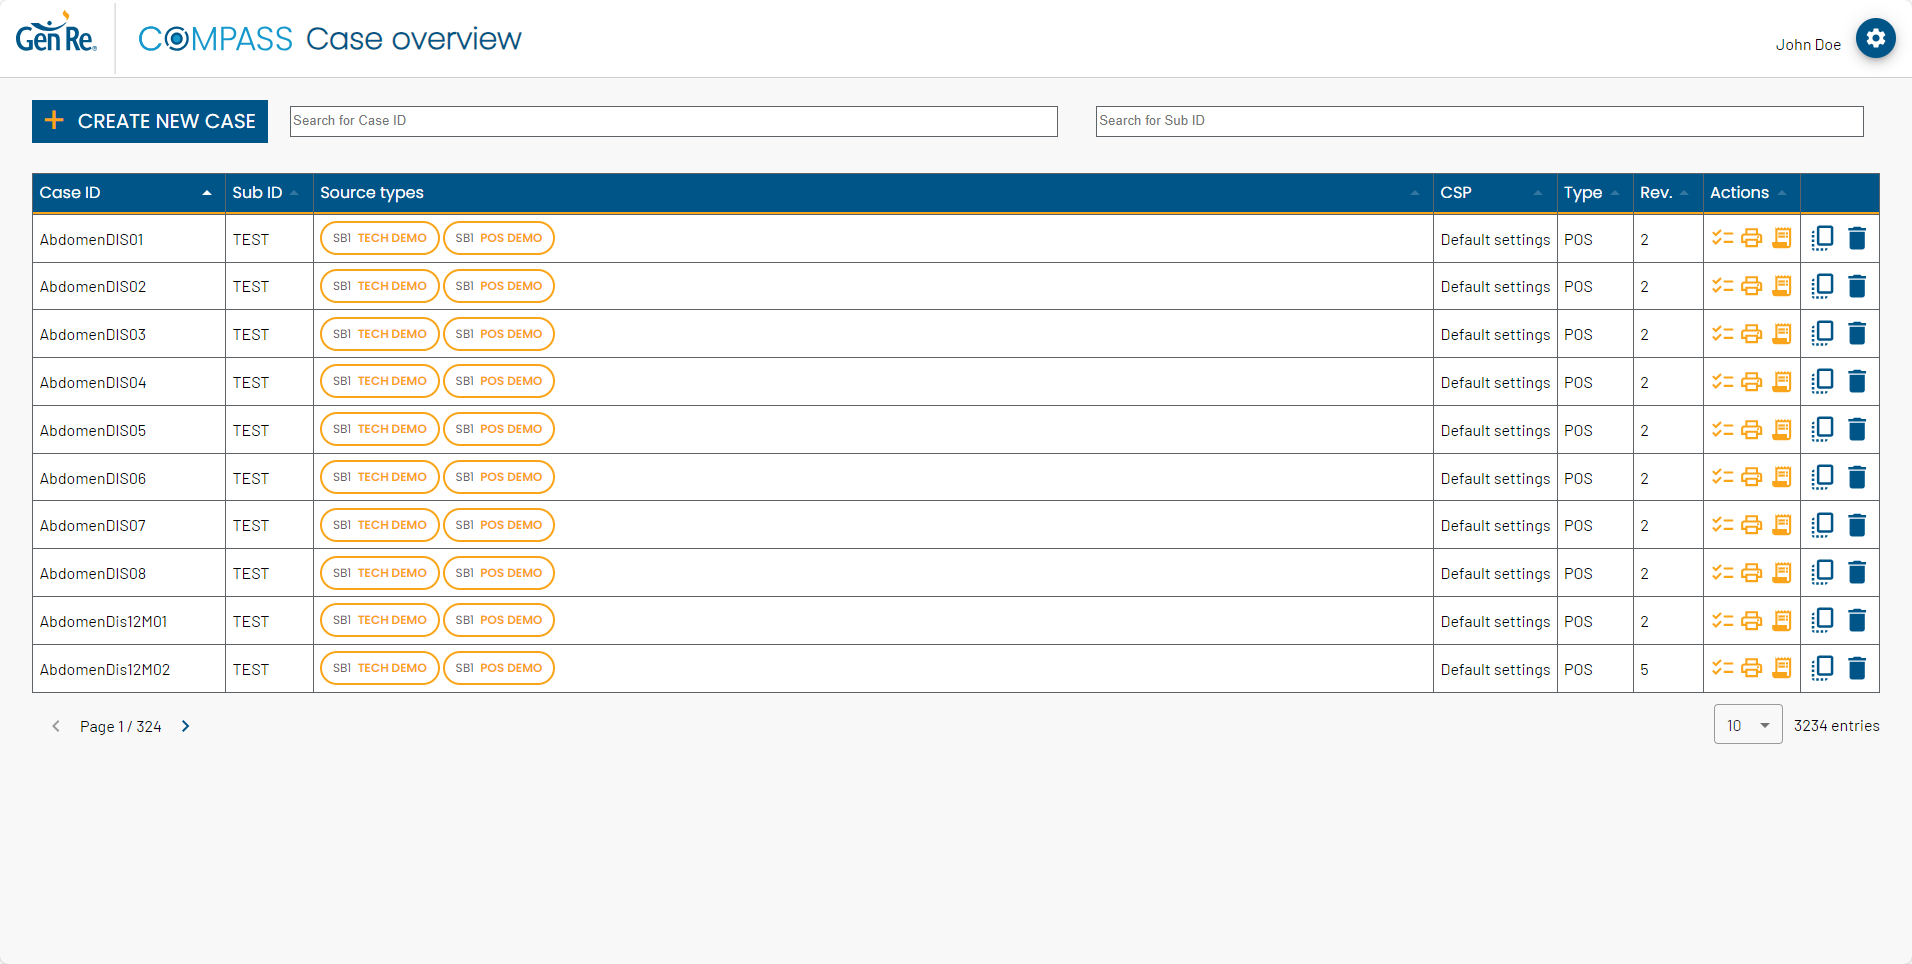
This overview enables the administration of applications.
|
Here Application stands for a life insurance application.
It contains the details of one or more persons applying for life insurance cover.
The application also contains information about the desired cover (e.g. disability, death, accident). The minimum information that COMPASS requires for risk data collection and subsequent verification is called technical data. When a new application is created, the parameters (CSP) and the mode (type) to be used for the application are defined. Once specified for an application, they can no longer be changed! Here CSP stands for company-specific parameters, i.e. for a set of parameters. Type stands for the capture and assess mode: Depending on the type of application selected, it is displayed here whether it is a point-of-sale or a standard case: POS or HeadOffice.
|
The captured applications are uniquely identified by an Application ID/Case ID and a Sub ID.
They correspond to the columns rex_CaseID and rex_SubID in the COMPASS case database table.
|
Case ID is the identifier of the application. It can be up to 20 characters long, and should be alphanumerical without blanks. The Sub ID allows a subdivision of applications. It can be up to 4 characters long. |
The columns

Each table row describes an existing application. In addition to the identifiers of an application (Case ID and Sub ID), there are the following columns:
Source types
A Source type is a collection of questions. They usually correspond to the application form
that an insurance customer must complete.
Certain Source types are intended for capturing technical data (such as benefits, duration, sum, etc. - here: ‘Tech Demo’).
These technical Source types are required for the creation of (test) cases.
In production technical Source types play only a secondary role.
Further Source types are defined for capturing risk data. These should be easy to answer, as
they are used in production to answer questions.
These risk Source types always fulfil the SB1 protocol.
In addition, some Source types fulfil the SB2 protocol. Such SB2 Source types are colour-coded
(blue instead of orange) as well as marked by the small SB2 in front of the application type name.
The Source types column shows all Source types that have been run through for the current application.
When an application is processed/captured with an additional Source type (see Risk data entry), this application type is also listed in the Source types column.
| Source types that have been run through can no longer be removed from an application! |
CSP
When a new application is created, a set of parameters (CSP) for capturing and assessment has to be defined. Once the application has been created, this parameter set can no longer be changed.
Type
When creating a new application, each application receives the information as to whether it is intended for use in the head office (standard mode) or at the point of sale (POS mode). Once the application has been created, this mode can no longer be changed.
Rev.
This value indicates how often the application has been captured/modified.
Actions
The 3 icons represent the most important COMPASS operations

Capture/modify case (Capture dialogue)

Print application information (Print Source type)

Assess application/show result (View result)
If the option Show Assess button has been activated in the Settings, a fourth operation is displayed.

Assess application
These operations are described in detail in the chapter Application-related functionality.
General
After completing the capture of a Source type, the view switches back to the application overview. The last processed application is then briefly highlighted in blue and the table page with the application is automatically displayed.
Create an application
To create a new application/case, this button must be selected.
The following dialogue "New Case" opens.
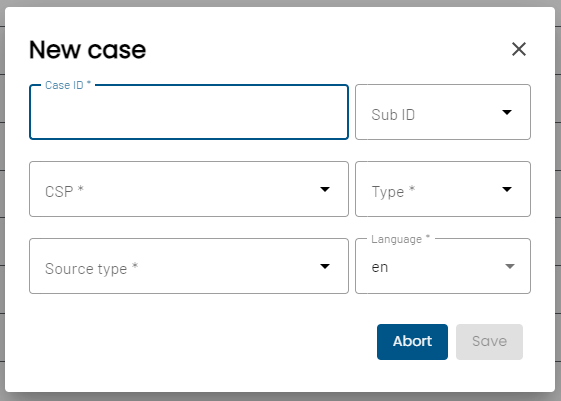
The Case ID and Sub ID of the application must be entered here so that it can be identified later.
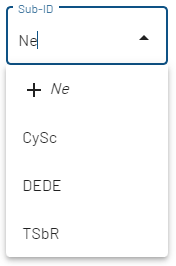
While the Case ID is entered via a text field, the value for the Sub ID can be selected from existing ones, or be inserted as a new one. To do this, you can either click on a value from the list or type in a new ID, which is then selected via the field with the +.
In addition, CSP, Type, Source types and the language of the case must be specified.
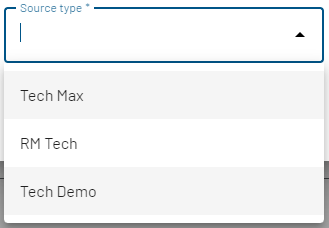
These values have to be selected from lists, which allow a search via the text field on top. The available Source types for the new application are technical Source types only.
The available options for CSP and Source type must be configured beforehand. Only in multilanguage versions of COMPASS you can select the language. The Type always contains the options POS and HeadOffice.
Once all required information has been filled in, the Save button becomes active and the selected Source type opens in a new window. After Capturing technical data, the application is created and can be found in the Application overview.
Delete an application

When clicking on the delete button, a confirmation dialogue appears. If the deletion process is confirmed, the application and all associated data will be deleted. If this was the last application of a Sub ID, this Sub ID will no longer appear in the list of Sub IDs and must be reentered manually if required.
| A deleted application cannot be restored. |
Copy application

Using the copy button it is possible to create a copy of an application, with all its Source types and entered answers.
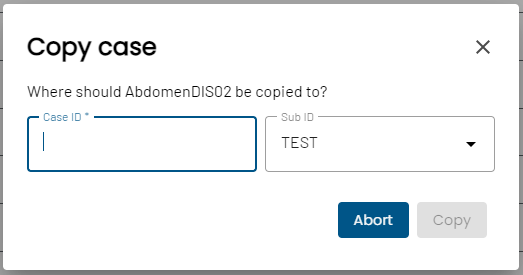
A dialogue appears in which a Case ID and the Sub ID for the copy can be specified. The fields work in the same way as for Create an application.
Application-related functionality
This section looks at the operations that can be triggered per application in the Actions column.
Capture with an existing Source type
An existing Source type of an application can be opened directly from the application overview by clicking on the Source type. The capturing can also be started via the Capture dialogue by clicking on the ‘Capture’ icon next to the desired Source type.

Capture with a new Source type
Another Source type can be selected via the Capture dialogue.
Capture dialogue
The Capture dialogue offers a range of possible actions for the selected case/application.
It has to be used to capture application details with a new Source type.
It also provides an overview of all already entered Source types and whether they have been completed.
The options in detail:
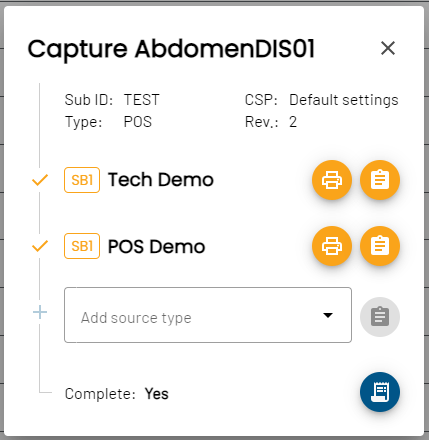
New Source types
A new Source type can be added via the ‘Add Source type’ field.
In this field, you can search for Source types or select one directly from the displayed list.
The entry is confirmed with the ‘Enter’ button next to it,
which starts the capturing process.
Existing Source types of the application
The already captured Source types are displayed in the centre, and can be opened via the Capture button.
The icons on the far left show whether a Source type has already been captured correctly/fully.
If this is the case, a ✓ is displayed next to the application type.
There is also a summary at the bottom of the dialogue indicating whether all Source types are complete.
General information
At the upper part of the dialogue you find information on the Sub ID, CSP, Type and number of revisions.
Actions
All possible actions for the current application can be executed from here.
As described above, you can start the capturing of new or existing Source types.
It is also possible to print a Source type from here (there is a ‘Print’ button next to each Source type. More on this in Print Source type)
Assess
This option is only available if the ‘Show assess button’ has been activated in the settings.
Otherwise the application is automatically assessed whenever the result is requested.
The button is only displayed/activated when all current Source types have been completed correctly.
Once the application has been assessed, and afterwards modified,
a new assessment should be triggered manually - otherwise the old assessment result will be shown.
View result
Case 1: Standard case
The show result button is only visible/active if all specified Source types have been filled in correctly.
The application is implicitly assessed before the result is displayed.
Case 2: ‘Show Assess button’ is activated
The show result button is only visible/active if the case has been assessed at least once
by clicking on the assess button.
The assess button can only be used once all specified Source types have been completed correctly.
| You can check whether an application has been filled out completely and correctly in the Capture dialogue. |
Click on the results button to display the Result overview.
Result overview
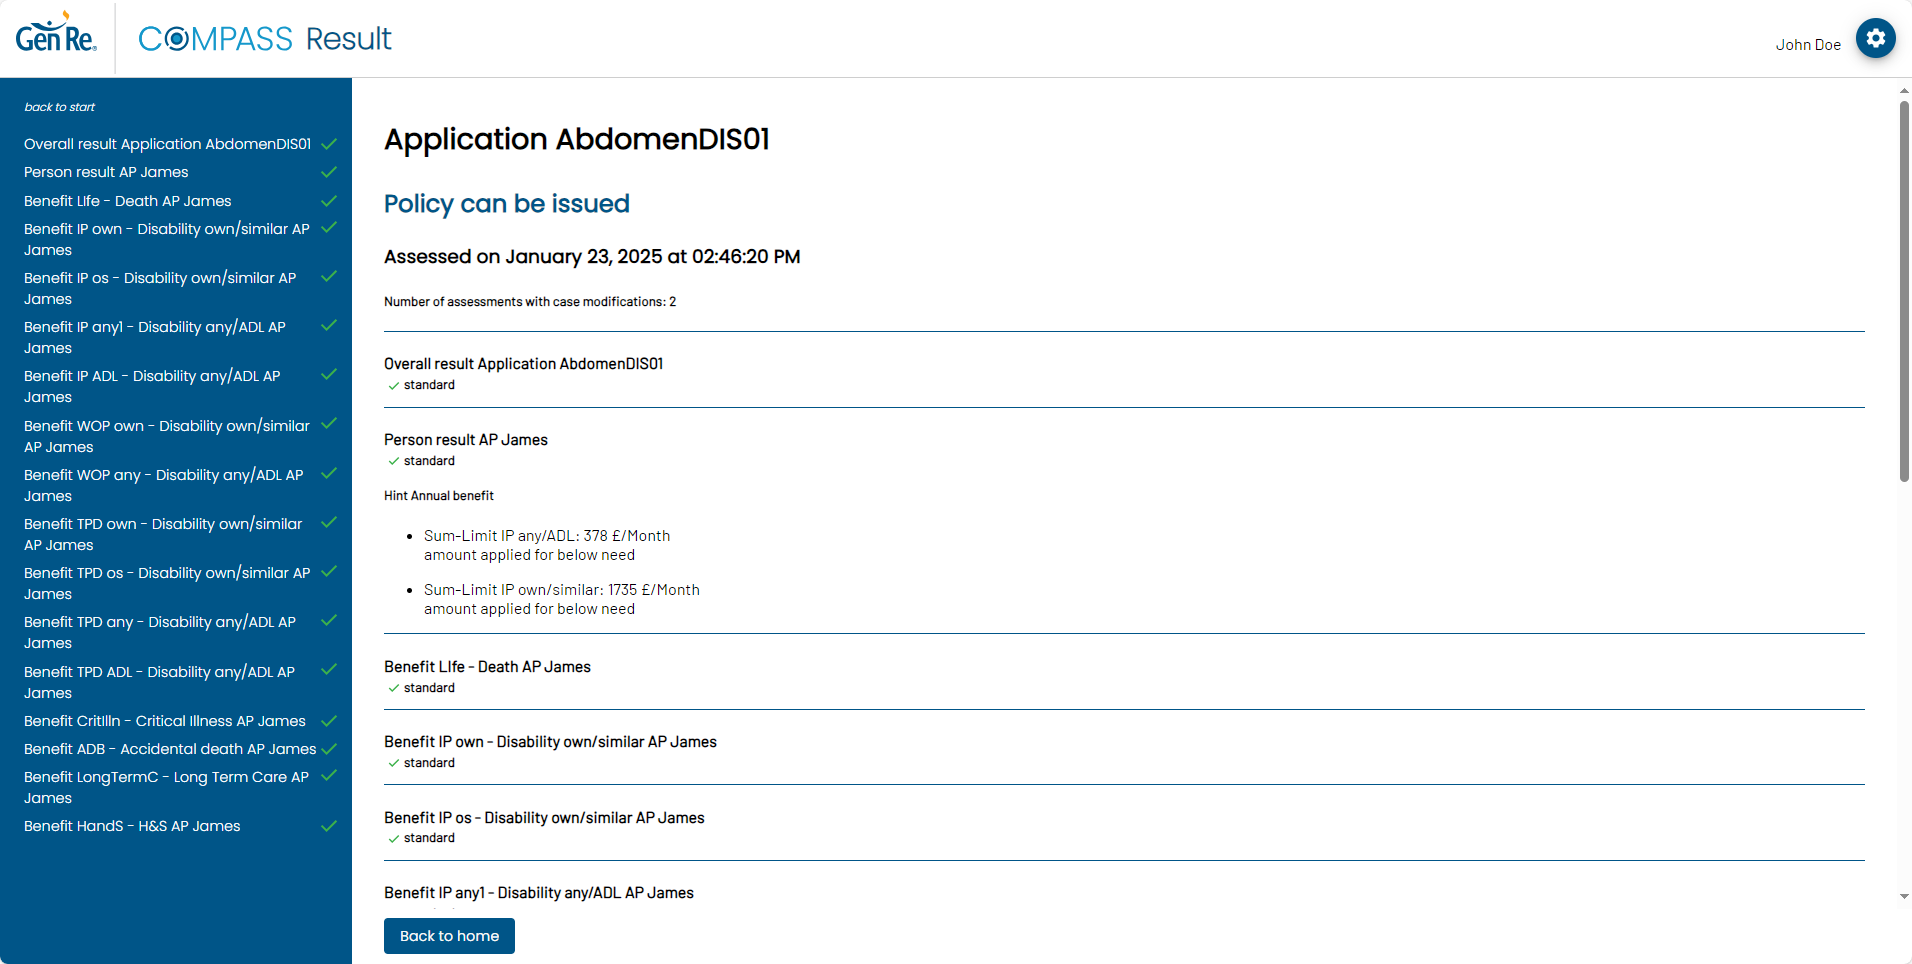
The result overview provides information about the current application - e.g. if it can become a policy, and what substandard risks it involves. An overview of the benefits, persons and their assessment results is listed in the left-hand bar. The following icons are used to specify a rough categorisation of the result:

normal (there is no mentionable risk, policy / benefit can be accepted)

Offer (new offer with possible exclusion clause, loading or similar)

refer / information request (must be forwarded to an underwriter or more information is required)

decline (Leads to rejection of the application)
You can click on the relevant section in the left-hand bar to see the assessment details about this section.
Print Source type
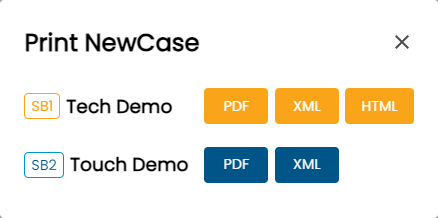
This dialogue allows the printing of a Source type in various formats. For SB1, the formats PDF, XML and HTML are available, for SB2 only PDF and XML. After clicking on the button, a new window opens with the desired information in the requested format.
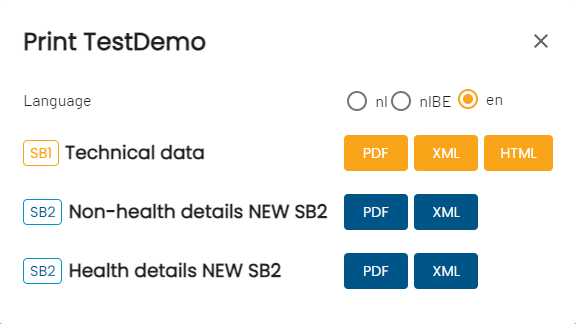
When COMPASS runs as in multi-language mode, you can also select the language of the printout.
General functionality
Filter

The two text fields can be used to filter the applications by their ID or their Sub ID.
If both filters are filled, only applications that fulfil both filters are listed.
If a filter field is filled, an X appears to the right, which can be used to reset the field.
Sorting

By clicking on a column header, the applications can be sorted according to this column.

With the first click the applications are sorted in ascending order.

The order can be reversed by clicking on the column again.

No sorting is done for this column at the third click.
The Case ID, Sub ID and CSP columns are sorted alphabetically, the Source type column is sorted by the number of shown Source types, Rev. by number and Actions by the number of available actions for this application (the section View result explains why certain actions are not displayed).
Pages (change, size)

The arrows below the table can be used to move between the pages. The number of available pages and the current page-number are displayed between the arrows. The dropdown on the right-hand side can be used to determine how many cases should be displayed per page (minimum 5 and maximum 100). The number of all applications is displayed on the far right.
Settings
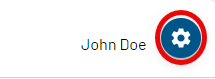
The cogwheel opens a list with 3 options.
-
Logout - causes the current user to be logged out
-
Settings - opens the settings dialogue
-
About - opens a dialogue with system information
Settings
-
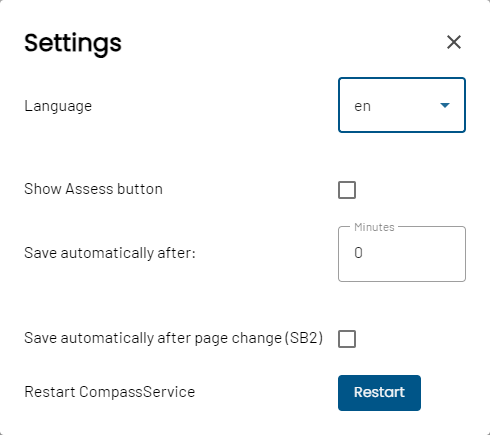
Language - this item can be used to change the language of the app if COMPASS is running as a multilingual system.
-
Show assessment button - if this option is activated, an additional ‘Assess’ action is displayed in the application overview, with which an application can be assessed manually. If this option is deactivated, the application is automatically assessed when the result is called up.
-
Save automatically after - if a value greater than 0 is set here, the data is automatically saved after the specified number of minutes when it is entered. Manual saving is still possible.
-
Save automatically after page change (SB2) - if this option is activated, everything on the current page is saved automatically before each page change in SB2.
-
Restart CompassService - restart the service running in the background. Can be used, for example, to make database changes by the RuleManager available in the CaseViewerApp.
About
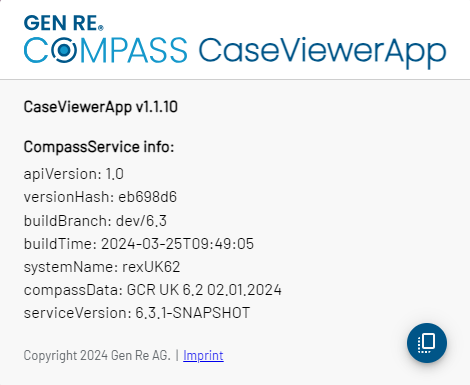
The versions of the app, the backend service and the data is displayed here. This information is stored in the clipboard via the copy button at the bottom right. It can then be pasted into whatever editor you choose.
Name
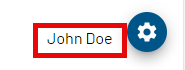
The name/user-ID of the person currently logged in is displayed here. When no authorization is used, nothing is displayed here.
Capturing technical data
Technical data is always captured in accordance with the ScreenBuilder 1 protocol (SB1). See General description of capturing in SB1 mode.
There is at least one technical Source type in each environment. In some cases there are several.
All have in common that you can define persons and then benefits that are requested by these persons.
The following describes the application type Tech Demo, which is part of many COMPASS environments. We describe every screen in the following:
Application
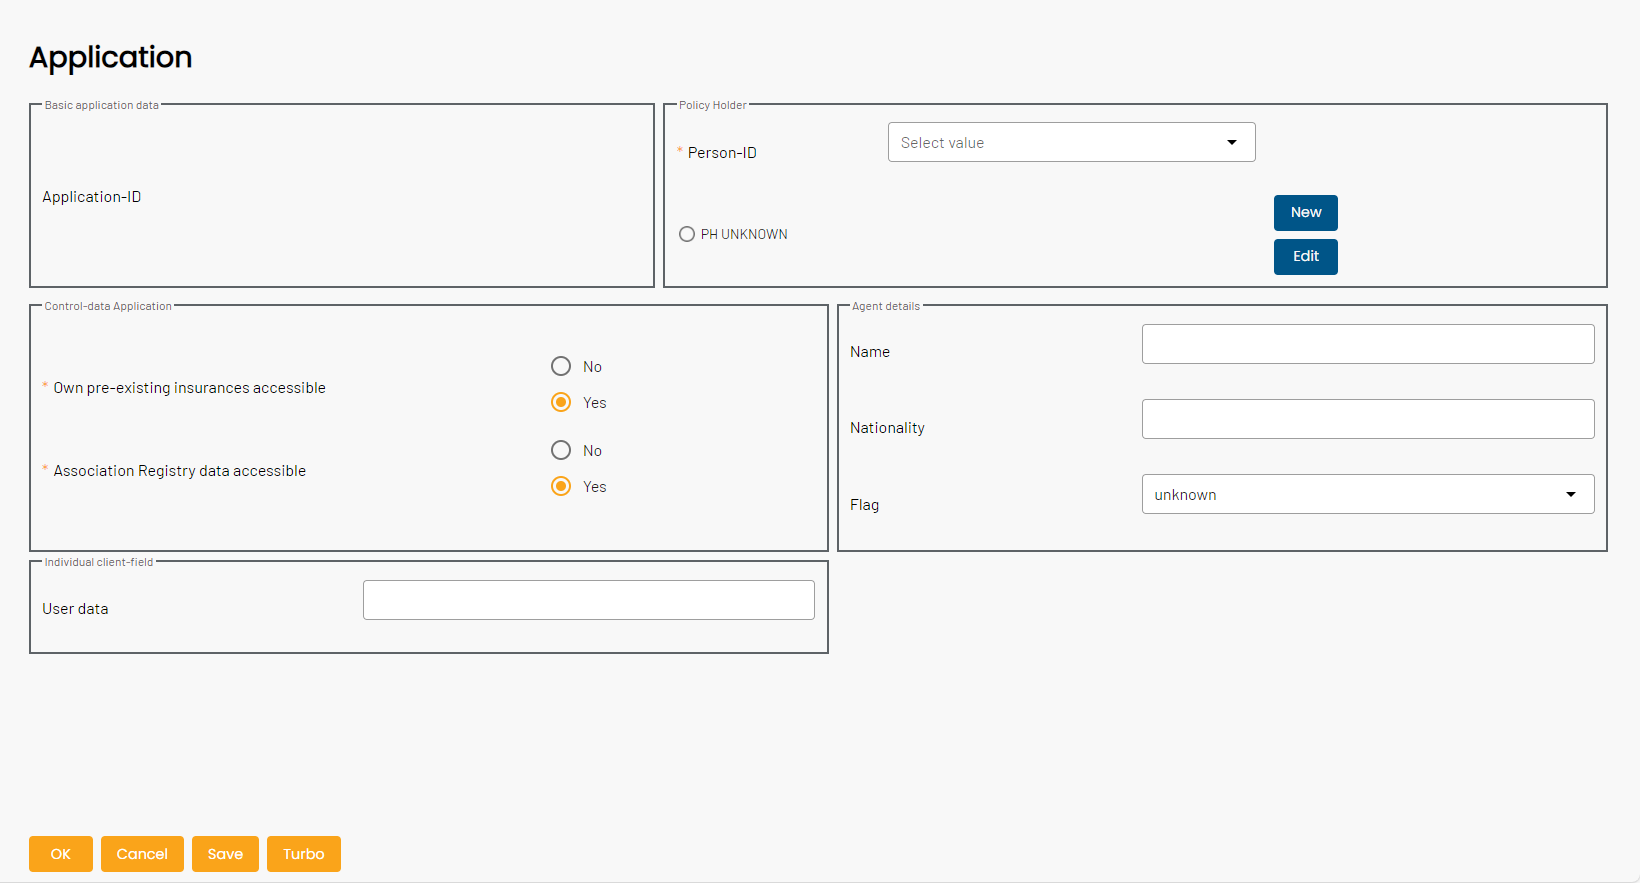
This screen contains the following information:
| Field | ⚠ | Description |
|---|---|---|
Application-ID |
👍 |
Prefilled with the ID of the case/application when created - do not adjust unless necessary |
Policy Holder - Person-ID |
👍 |
The PHs involved in the contract are specified here. Enter an ID for each PH. Any number of PHs is possible.
The details of the persons are entered in the following screen. There is always automatically one PH who is also the assured person (AP). |
Own pre-existing insurances available |
👍 |
Indicates whether insurance details with the current company are available and are included in the technical data. For test purposes you should select ‘Yes’. This does not mean that this information actually exists; if the answer is ‘No’ the application assessment is flagged as temporary. |
Association registry data accessible |
👎 |
No longer used. Was included for the UK market. For testing purposes set to TRUE. |
Userdata |
👎 |
Text input - Free text field. Information that is declared here can be used for any check during capturing and/or assessment. |
Agent details |
👎 |
3 fields that are never used |
Details PH
This screen is only asked for policy holders (PH) that are not also assured persons (AP), i.e. exclusive policy holders. By default, when a new application is created, a PH and an AP are created (without details), whereby the AP is also the PH. Therefore, by default, the Application screen information is followed by the screen for entering the APs. You have to specify an additional PH to see the Details PH screen
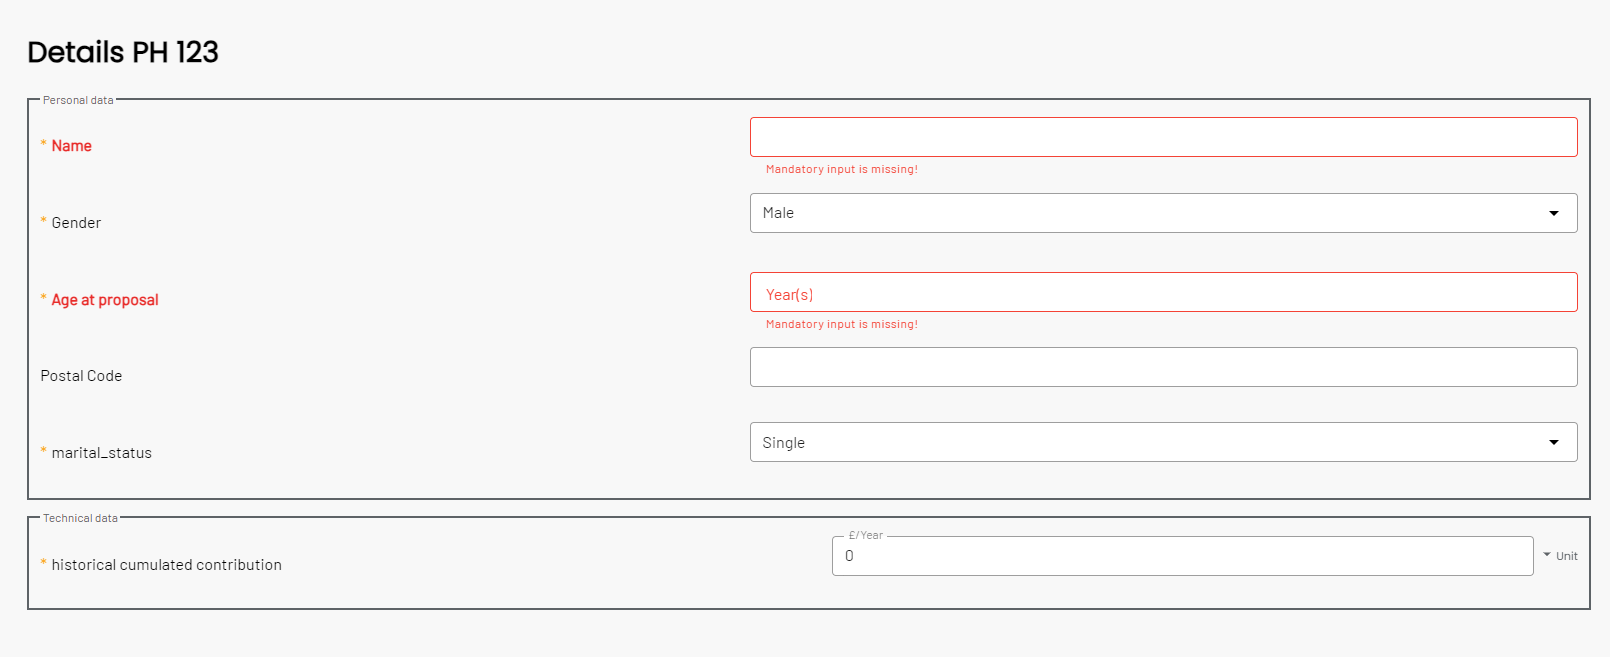
| Field | ⚠ | Description |
|---|---|---|
Name of the PH |
👍 |
The name is mandatory and will be displayed on further screens to make sure the correct person answers the questions |
Gender |
👍 |
The PH can also be a company - otherwise self-explanatory |
Age at proposal |
👍 |
Age at the time of application (only for PH a person) |
Postal Code |
👎 |
postcode. Only of historical importance. |
marital_status |
👎 |
The marital status of the PH. Only rarely referred to in some rules. |
historical contribution |
👎 |
Total of the policyholder’s current contributions to other insurance policies in your company. |
AP
The definition of the APs involved in the application is similar to the definition of the policyholders.
Each new person should be defined with a unique ID and added by clicking on ‘New’.
To remove one AP, click on the corresponding radio button and say ‘Delete’.
This does not apply to the last remaining person.
By default, one AP is always specified by COMPASS. If the application is for only one AP
you can go straight to the next screen by clicking OK.

| Field | ⚠ | Description |
|---|---|---|
Person-ID |
👍 |
Identifier for the AP. |
Details AP
The following screen appears for each assured person (AP):
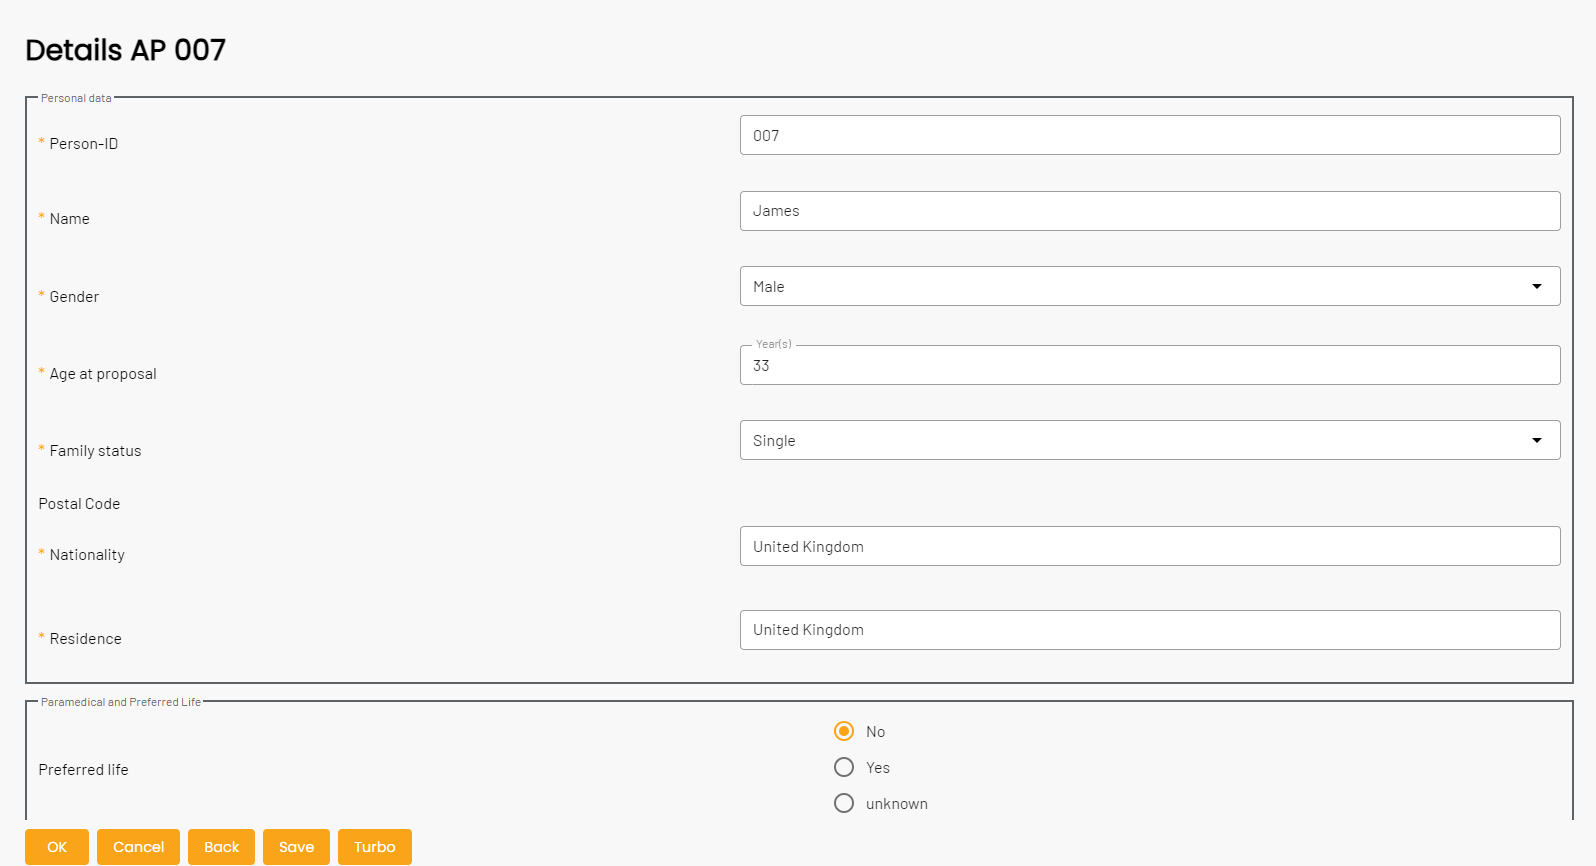
| Field | ⚠ | Description |
|---|---|---|
Person-ID |
👍 |
Prefilled with the ID when created - do not customise if possible |
Name |
👍 |
The name is mandatory and will be used later to differentiate between several people |
Gender |
👍 |
Self-explanatory |
Age at proposal |
👍 |
Age at the time of application |
Family status |
👎 |
Currently of minor importance. For historical reasons mandatory information on this screen. |
Postal Code |
👎 |
Postcode. Only of theoretical importance. |
Nationality |
👎 |
On this screen marked as mandatory information. Select the (main) nationality of the applicant. |
Residence |
👎 |
On this screen marked as mandatory information. Select the country of residence of the applicant. |
Preferred life |
👎 |
Field was introduced for the UK market, and has very little importance outside of this market. Not mandatory. |
Own pre-existing Insurance/ Association Registry
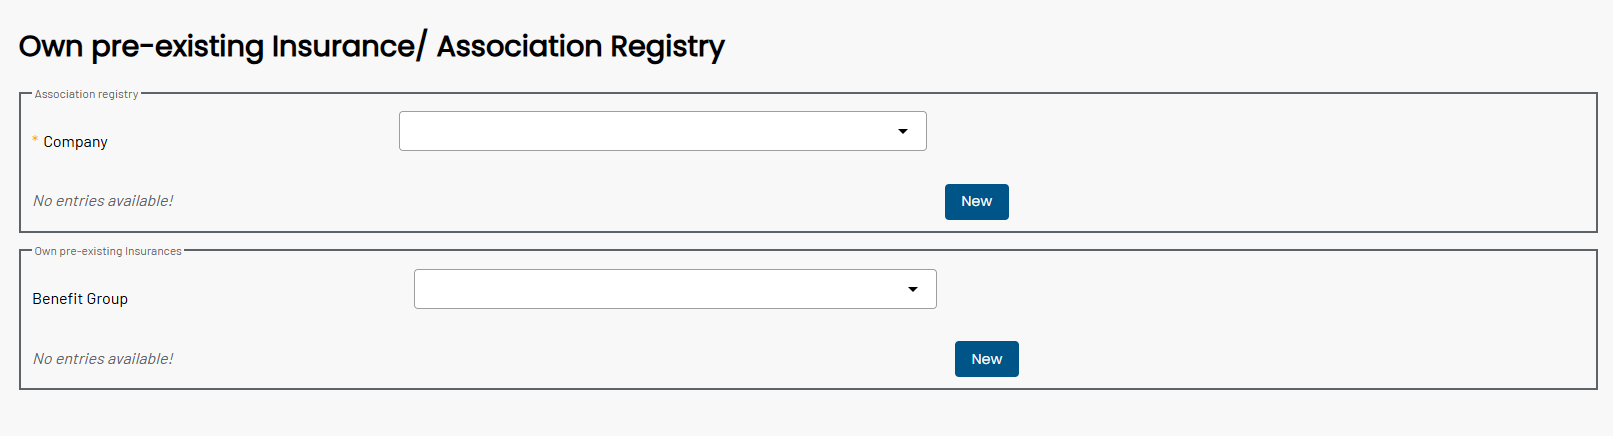
| Field | ⚠ | Description |
|---|---|---|
Association registry - Company |
👎 |
Historical in the UK - no longer used. |
Own pre-existing insurances - Benefit group |
👍 |
Here you select the type of benefit/product (event) for which there are existing insurances of the customer in the portfolio. The insurance policies are summarised in one benefit group/event, for example ‘death’. |
Association registry entry
Historical - was used to capture data from the Association registry. The screen is no longer needed, and is being removed step by step from all COMPASS versions.
Own pre-existing Insurances
This screens appears per person (AP) and per benefit group/event, as select on the screen Own pre-existing Insurance/ Association Registry. It records the information about previous insurances with the current insurance company - basically the sum insured.
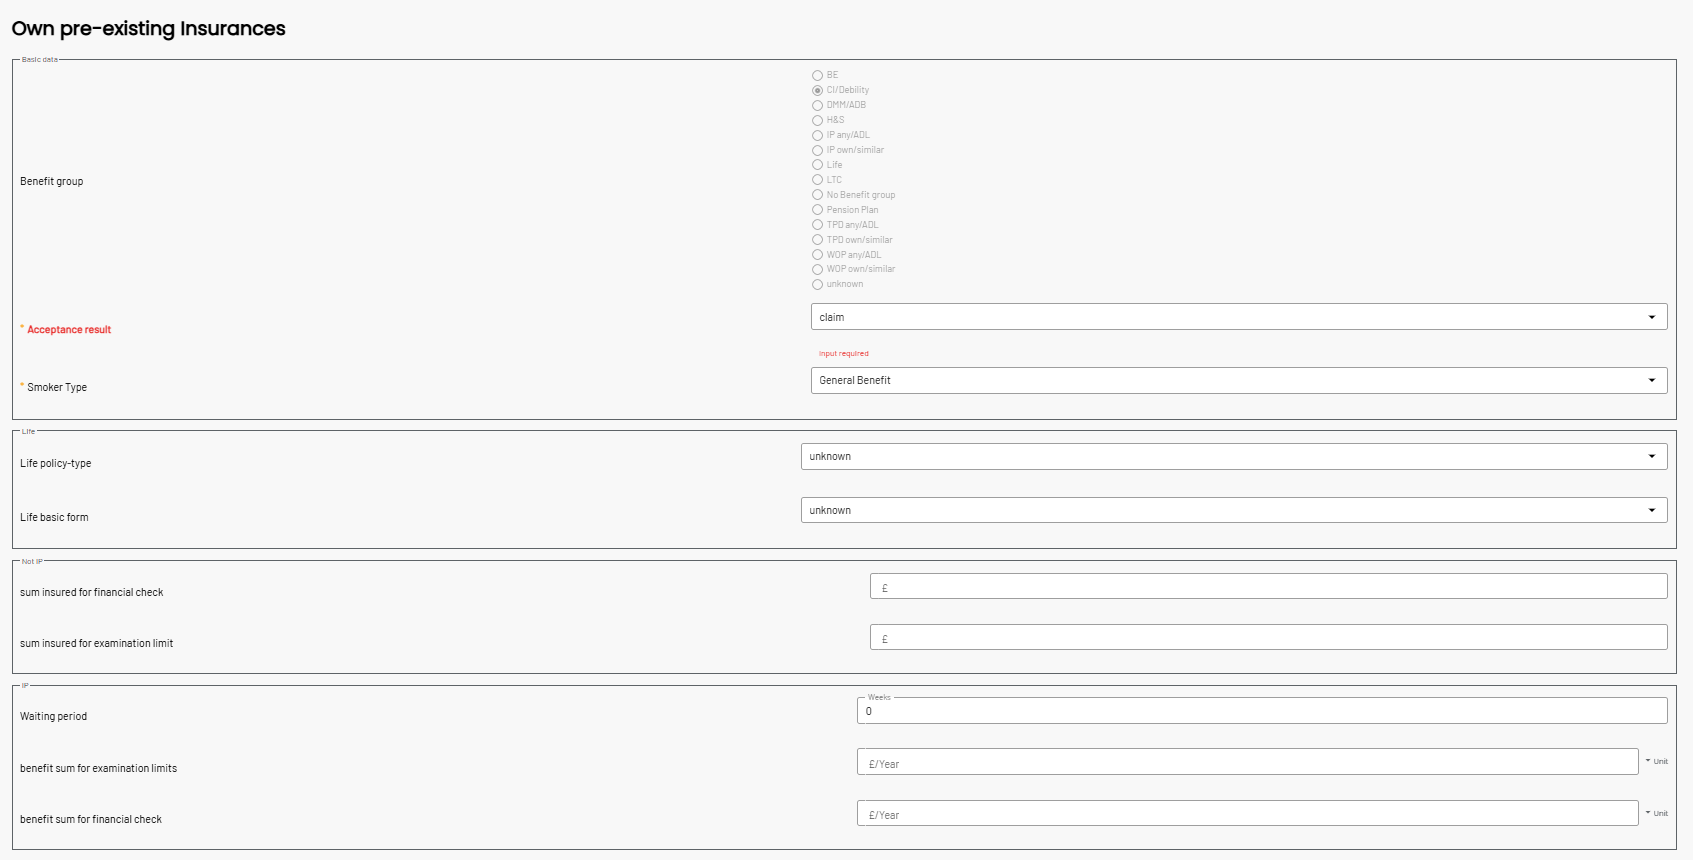
| Field | ⚠ | Description |
|---|---|---|
Event |
👍 |
Prefilled with the benefit group - readonly |
Acceptance result |
👍 |
Select the most unfavourable acceptance result for this event. |
Smoker Type |
👍 |
Select the "smoker type" of the existing benefits. Select "General" when in doubt. |
Life policy-type |
👍 |
Only for Life policies: sub-category of life benefits. leave empty for all other benefit groups. |
Life basic form |
👍 |
Only for Life policies: sub-category of life benefits. leave empty for all other benefit groups. |
Sum insured for financial check |
👍 |
Only for benefit groups that pay a lumpsum:
Sum of all policies' sum insured with the current company. |
Sum insured for examination limit |
👍 |
Only for benefit groups that pay a lumpsum:
Sum of all policies' sum insured with the current company. |
Waiting period |
👍 |
For IP products with a waiting period: define the shortest waiting period of the existing IP covers here. |
benefit sum for examination limits |
👍 |
Only for benefit groups that pay a regular pension:
Sum of all policies' sum insured with the current company. |
benefit sum for financial check |
👍 |
Only for benefit groups that pay a regular pension:
Sum of all policies' sum insured with the current company. |
Agreed Paramedical Examination
Historical - was used in the UK to capture data about a planned paramedical examination. The screen is no longer needed, and is being removed step by step from all COMPASS versions.
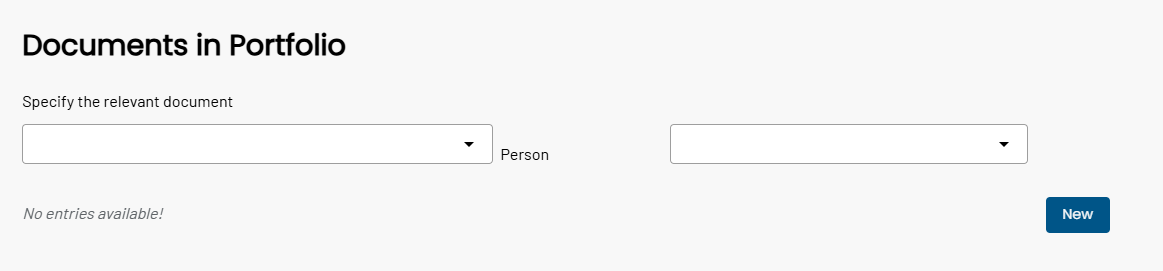
Documents in Portfolio
Documents that the insurance company already has about any of the assured persons can be defined here.
Please note that documents lose their validity over time and you should only define documents here that are still valid.
As soon as COMPASS decides that a document is required, it compares it with those defined here, as in that case
the document has not to be requested (again).
Specify the applied Benefits
The products of the insurance company are mapped to benefits in COMPASS.
A benefit is based on one or more events (e.g. mixed life insurance: payment in the event of survival or death).
Benefits and events have characterising attributes.
A benefit can include several persons, e.g. joint lives.
Each event relates to one person.
An overview of the supported benefits and corresponding events can be found in the COMPASS product documentation.
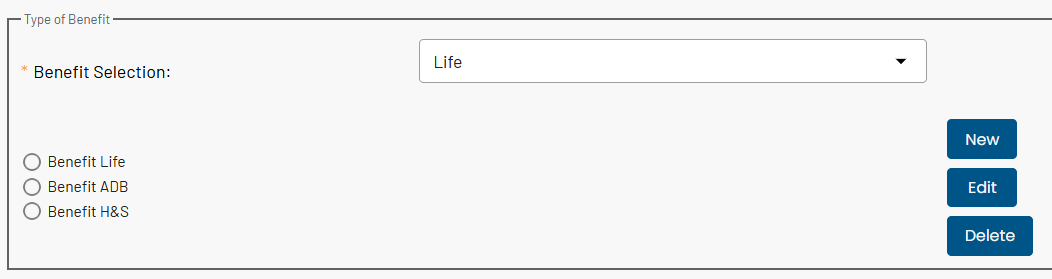
When creating a new case/application one Life-benefit is created by default. If this benefit is not desired, first create the new desired benefit and then delete the Life benefit.
| Field | ⚠ | Description |
|---|---|---|
Benefit Selection |
👍 |
Select the applied-for benefits from the offered drop down list. Further benefits on request! |
Basic Data for Benefit
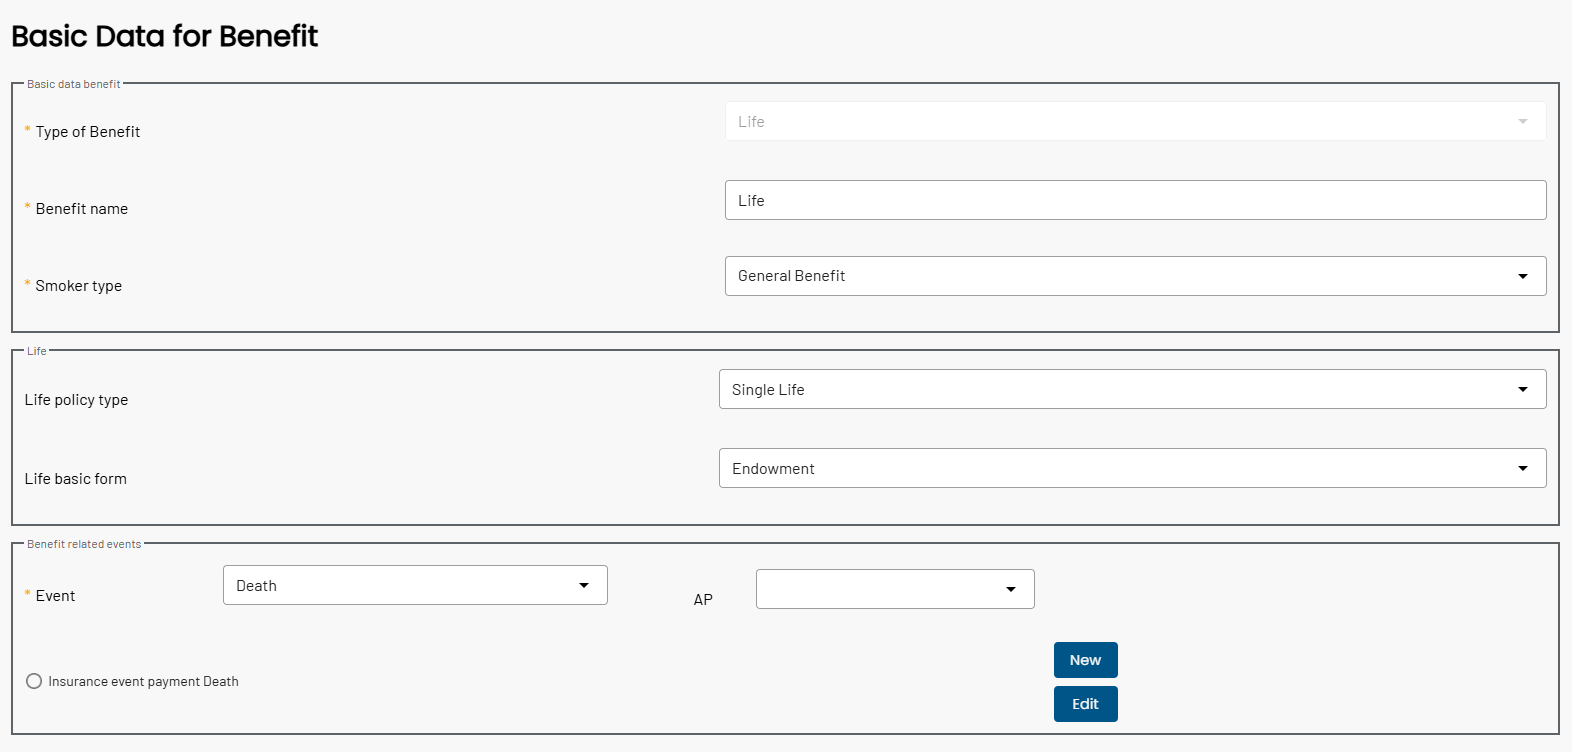
On this benefit screen you enter the basic data such as benefit name and relation to an event:
| Field | ⚠ | Description |
|---|---|---|
Type of benefit |
👍 |
Prefilled with the benefit type when created - read only |
Benefit name |
👍 |
Name of the benefit - Text field - mandatory |
Smoker Type |
👍 |
Select the "smoker type" for this benefit. Select "General" when in doubt. |
Life policy-type |
👍 |
Only for Life policies: sub-category of Life benefits. Leave empty for all other benefits. |
Life basic form |
👍 |
Only for Life policies: sub-category of Life benefits. Leave empty for all other benefits. |
Event |
👍 |
Define the "events" for which the insurance payment should be claimed.
As the insurance benefits are person-related, you must specify the person by their ID. |
Details Event Payment
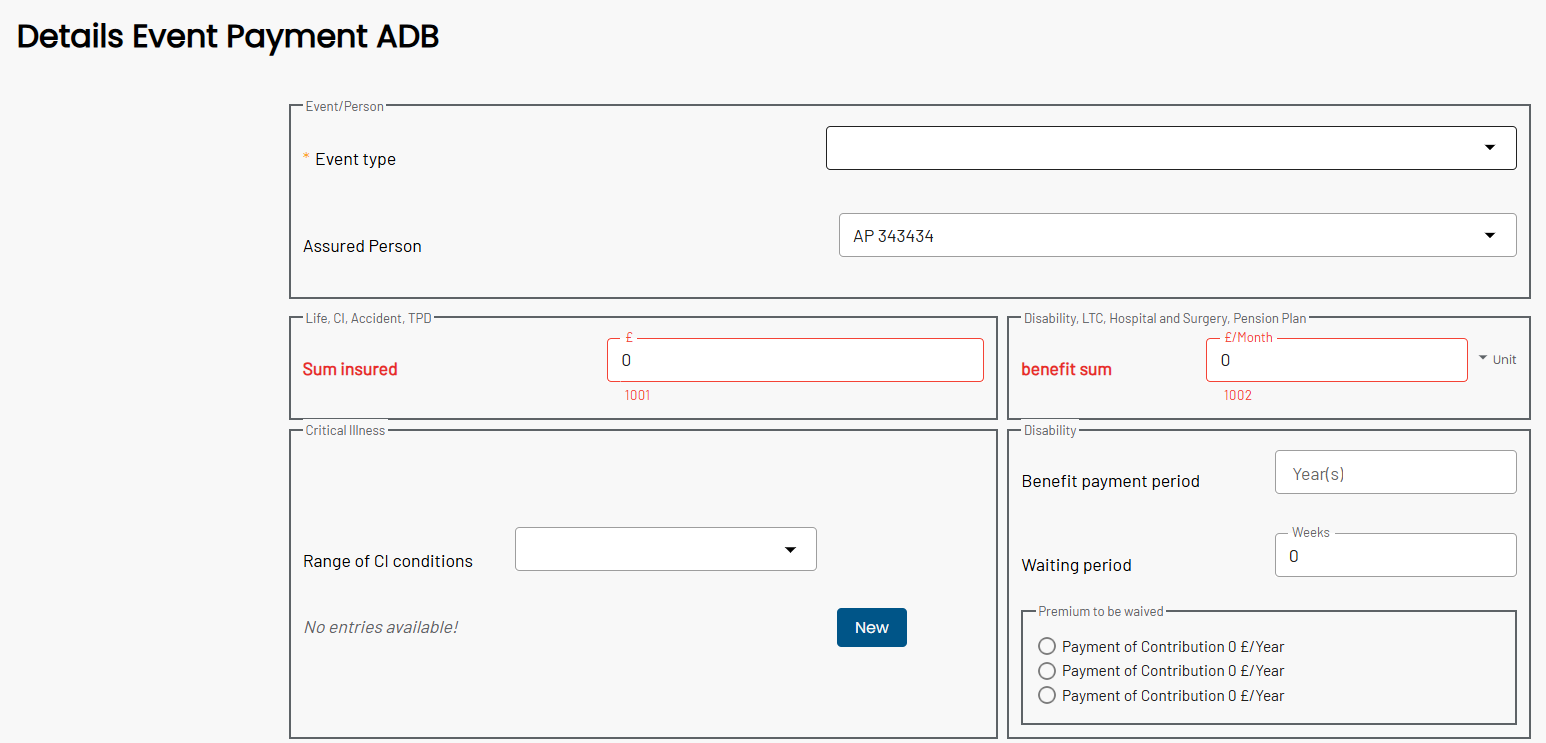
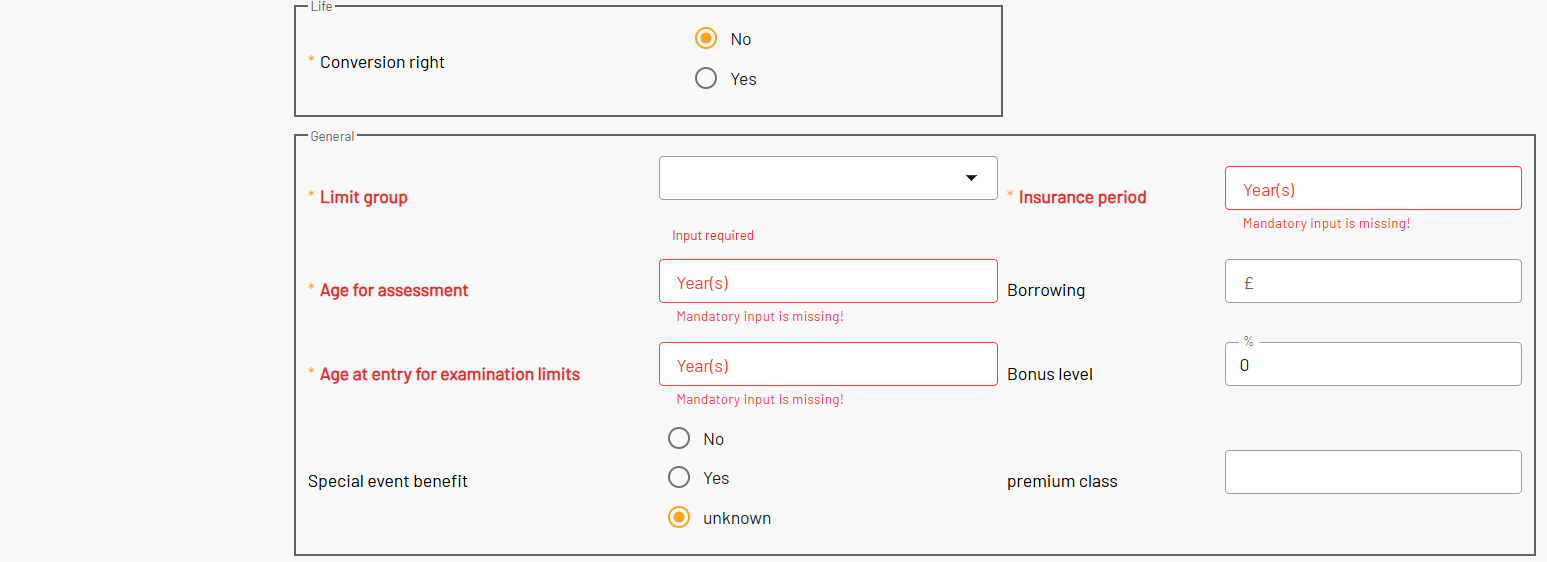
In this screen you define the attributes for the current event. Please note that the attributes of different benefit types are grouped in this screen, and that certain attributes can be mutually exclusive (e.g. sum and pension - see their unit). For reasons of clarity, attributes belonging to the same benefit type have been grouped by a frame.
| Field | ⚠ | Description |
|---|---|---|
Event type |
👍 |
Prefilled with the event on creation - do not customise if possible |
Assured person |
👍 |
Prefilled with the insured person on creation - do not adjust if possible |
Sum insured (for Life, CI, Accident, TPD) |
👍 |
Sum insured, when the sum insured is a lumpsum payment |
benefit sum (for Disability, LTC, H&S, Pension Plan) |
👍 |
benefit sum/pension - when the payment is periodic |
Range of CI conditions (for the CI benefit) |
👎 |
Only for CI benefit: define which body/medical areas are covered by the current CI benefit. |
benefit payment period (Disability) |
👍 |
Duration for regular payments - typically for IP benefits. |
Waiting period (Disability) |
👍 |
Waiting period for certain disability payments |
Premium to be waived |
👎 |
For Waiver of premium benefits: select the premiums that are covered |
Life - Conversion right |
👎 |
If the risk insurance includes a conversion right, answer ‘Yes’ |
General - Limit group |
👍 |
Select a limit group, according to which limit (medical and financial) will be requested. |
General - Age for assessment |
👍 |
Age of the AP to be used for the assessment |
General - Age at entry for examination limits |
👍 |
Age of the AP to be used for the evaluation of the limit tables. Typically the same value as in the field age for assessment. |
General - Special event benefit |
👎 |
Rarely used: Say YES if a special event benefit is included in this benefit |
General - Insurance period |
👍 |
Duration of this benefit |
General - Borrowing |
👎 |
Rarely used - check knowledge description. Historical |
General - Bonus level |
👎 |
If an additional bonus is paid when the benefit is due, the amount can be taken into account when checking the examination limits. |
General - premium class |
👎 |
Rarely used - check knowledge description. Historical |
Contribution/Payment
For each benefit a premium will must be paid. Details about this premium are included on the following screen.
Several fields are marked as mandatory, even though they hardly play a role in the assessment.
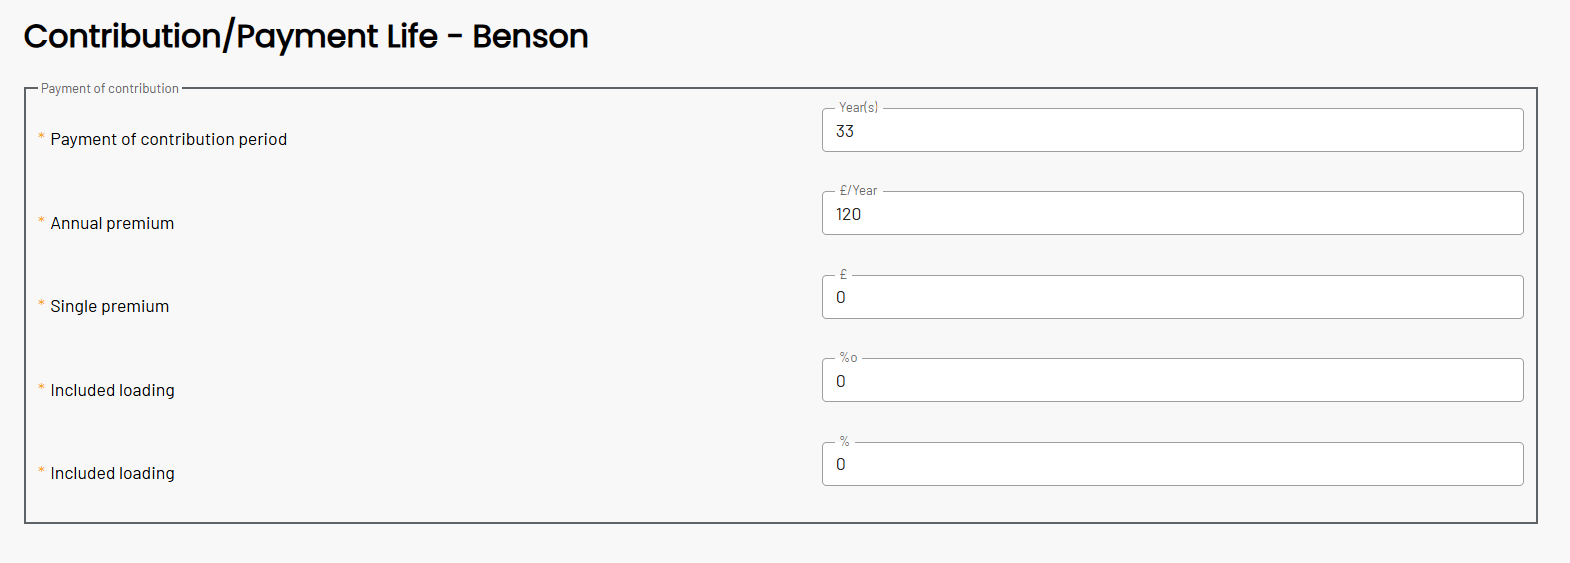
| Field | ⚠ | Description |
|---|---|---|
Payment of contribution period |
👍 |
Period in years that this premium will be paid |
Annual premium |
👍 |
Amount of premium that is paid per year |
Single premium |
👎 |
If the premium is paid as a single premium - insert the amount here |
Included loading (in per mill) |
👎 |
Only for benefits that produce a per mill loading: If a loading has already been accepted for the insured person, the loading should be entered here (e.g. for occupational risk). COMPASS will then take the surcharge into account during the assessment. |
Included loading (in percent) |
👎 |
If a loading has already been accepted for the insured person, the loading should be entered here (e.g. for occupational risk). COMPASS will then take the surcharge into account during the assessment. |
Risk data entry
This chapter describes some general handling of non-technical Source types. These Source types are generally used to capture the risk data of the assured person (AP) or the policyholder (AP).
The chapter contains some unspecific advise on such Risk Source types. Information for specific questions is not provided, as these Source types are very company-specific. Each insurance company can define individual help texts for questions.
All Source types fulfil the SB1 protocol: ScreenBuilder 1.
A subset also fulfil the SB2 protocol: ScreenBuilder 2.
The representation in SB1 format is described in Capturing in SB1 mode and General description of capturing in SB1 mode.
The SB2 representation is described in Capturing in SB2 mode.
Capturing in SB1 mode
This chapter describes certain UI components/widgets individually. Additionally refer to the general instructions for capturing/modifying an application in SB1 mode (see General description of capturing in SB1 mode).
Numeric fields
Enter numbers in a text input field:

Only the input of numbers and decimal separators is permitted. A decimal separator is only permitted if this is permitted for this particular question (COMPASS model).
Error messages appear if the value is too large or too small:

The unit is specified in the frame. When several units are possible, a combo box at the end of the field allows the selection:

When entering blood pressure values a numerical pair of integers is expected:

The unit is currently displayed in the second field.
Text fields
Most text fields are single-line and have a maximum length:

Texts is entered as usual. When the maximum length is exceeded, an error message appears:

Fields that allow multi-line input are displayed in a different height:

Selection lists
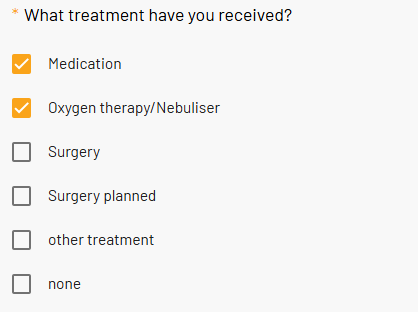
There are 2 main options for selection lists: single selections and multiple selections.
A single selection is always displayed as vertical radio buttons
- regardless of the widget defined in the RuleManager:

A multiple selection is displayed as a list with checkboxes:
Date/Period of time
A date can be defined by declaring a day, month and year
or a month and year (see screenshot below)
or just a year.

Special feature: you can also leave the day, or the day and month empty.
This is often used if, for example, a customer needs to state the start of an illness.
They can usually remember the year and possibly the month, but it is unlikely that they know the exact date.
In SB1 mode time period is displayed by a hard-coded widget consisting of a start date, an end date and a duration:

This representation is neither attractive nor consistent. In SB2, the capturing of a time period is displayed in a user-friendly way.
Relations
A relation occurs when you can select zero, one or more objects. For example, in the case of smoking:
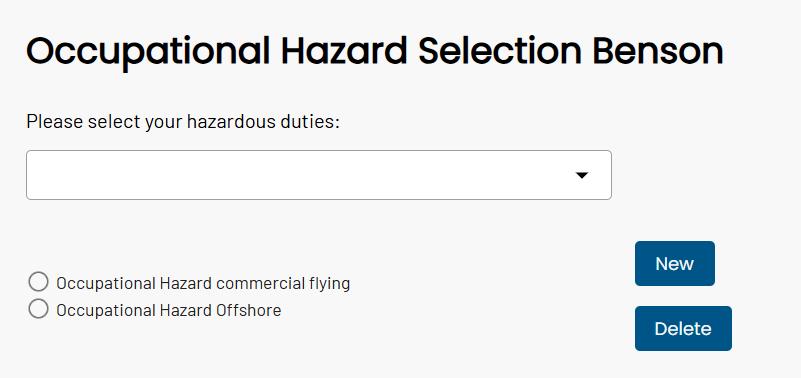
You can add another object (in this case another smoking type) via the text input field and clicking on NEW. If you want to remove one, activate the corresponding radio button and click on DELETE.
For some relations, 2 or more selections must be made before clicking on NEW:
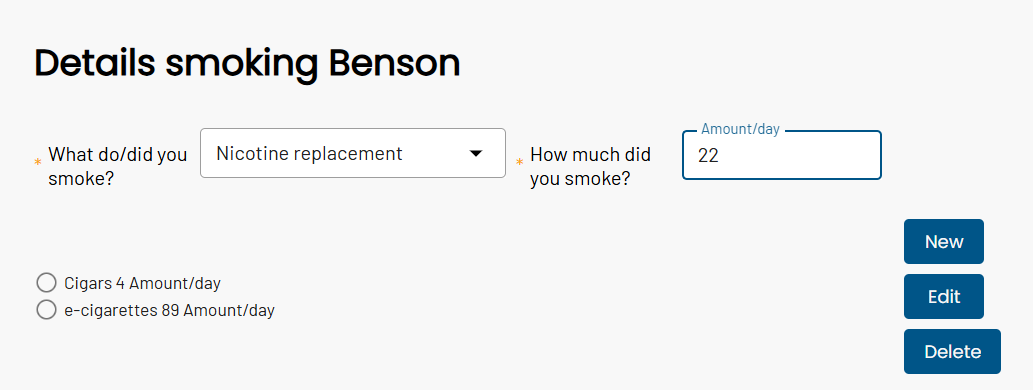
Then there are relations where sub-screens are added for each object:
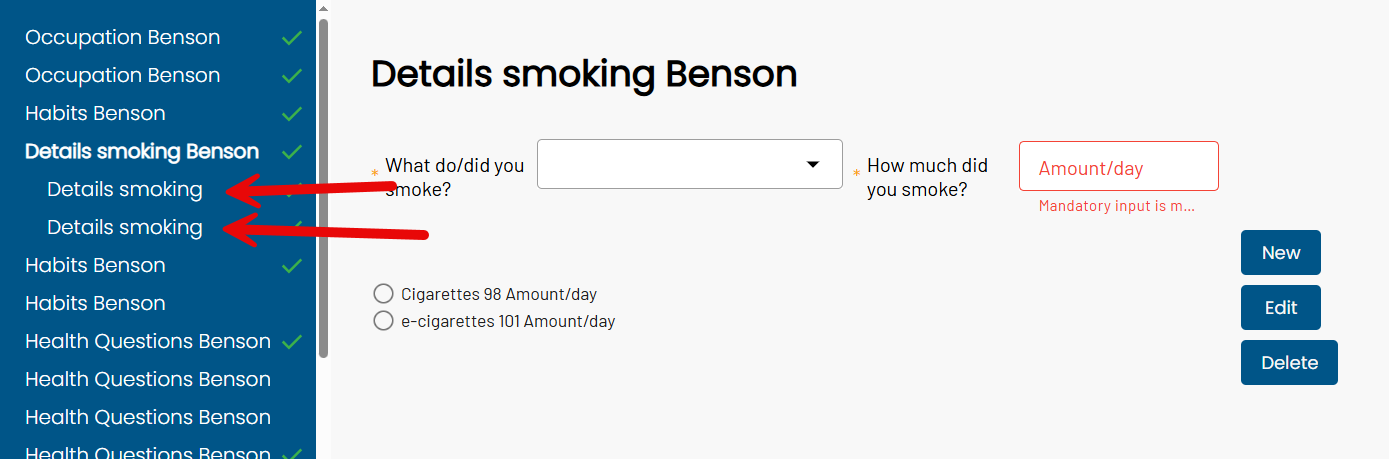
In such a case, an EDIT button appears, which takes you directly to the detail screen of the object (selected via the radio button).
Searchable relation
For certain target objects the list would be too long. In such a case COMPASS includes a Search functionality. This is the case for
-
Countries and nationalities
-
Sports/Pursuits
-
Diseases/Disorders
-
Professions/Occupations
-
Insurance companies
-
and possibly others
When a term that was entered was not found as an exact match
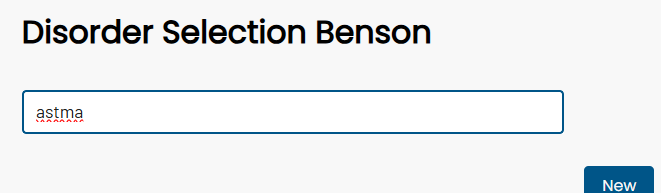
COMPASS responds with a search dialogue
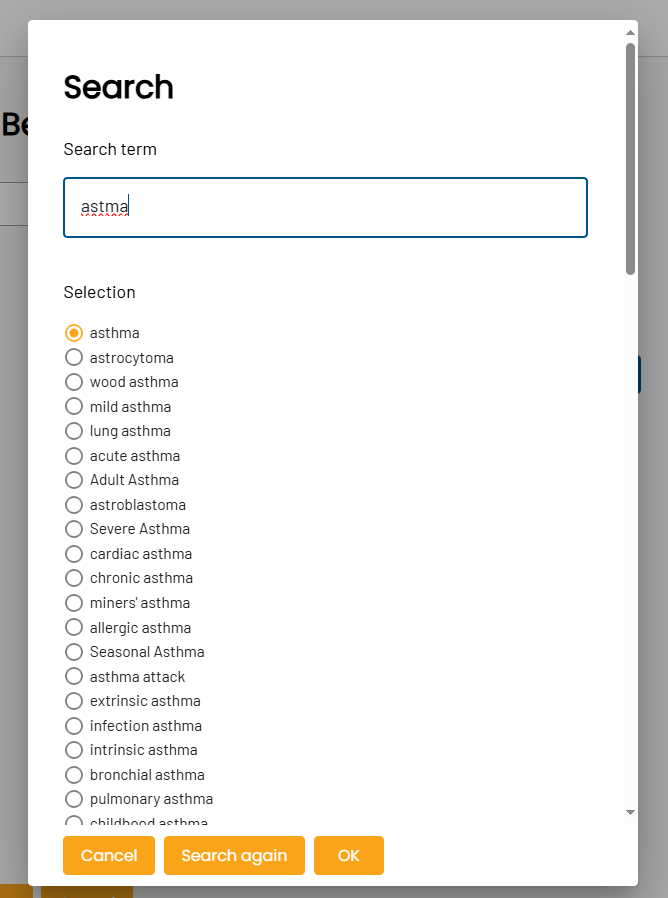
in which the desired term can be selected and accepted via OK.
In the text input of the search dialogue, the search term can also be adapted and a further search can be initiated via SEARCH AGAIN.
The customer can click CANCEL when insisting on the original term.
Help texts
If a help text for a question has been defined, it is displayed as a tooltip in the blue ⓘ. Help texts that have been defined for a label are displayed to the right of the label. Texts that have been defined for the input field are displayed to the right of the field.

Error messages
Error messages are displayed in red:

In some cases also the frame of the field is highlighted in red:
Error description texts are displayed either below the field or can be accessed via the blue ⓘ as a tooltip.

Capturing in SB2 mode
The SB2 concept is based on contexts/pages that group a series of questions per person.
You can navigate between these persons and contexts, but there is also a
suggested order in which the persons and contexts should be run through.
In SB2, every change/input is processed directly, i.e. some buttons that appear in the SB1 display are
not found here.
The remaining buttons are ABORT CAPTURE (CANCEL) and SAVE. ABORT CAPTURE is followed by a question asking if the data should
be saved before leaving, and with SAVE the information entered so far is saved (in the case XML, in the database).

The display of a question with its answer / answer option is always on one row:
- the question text on the left
- the answer on the right
Navigation / Contexts
On the left-hand side a navigation between contexts and persons is possible:
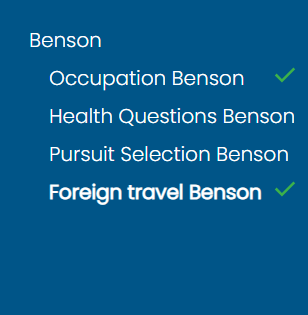
Click on a context to navigate to it. The currently displayed context is shown in bold.
Contexts that have been answered satisfactorily (for COMPASS) are marked with a green ✓.
In the example above
the health and pursuit areas of Max Mustermann have not yet been answered sufficiently.
In addition to the navigation on the left, you can also navigate using the two icons in the footer

By clicking on them you navigate through the contexts/screens in the intended order.
Once all contexts have been answered satisfactorily, a further button appears in the footer, which triggers a final check and, if there are no inconsistencies, exits the capturing dialogue:

Numeric fields
Numeric input is made using numbers in a text input field:

Only the input of numbers and decimal separators is permitted. The decimal separator is only permitted when the questions allows it - defined in the COMPASS model.
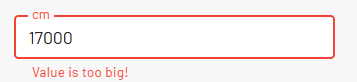
Error messages appear if the value is too large or too small:
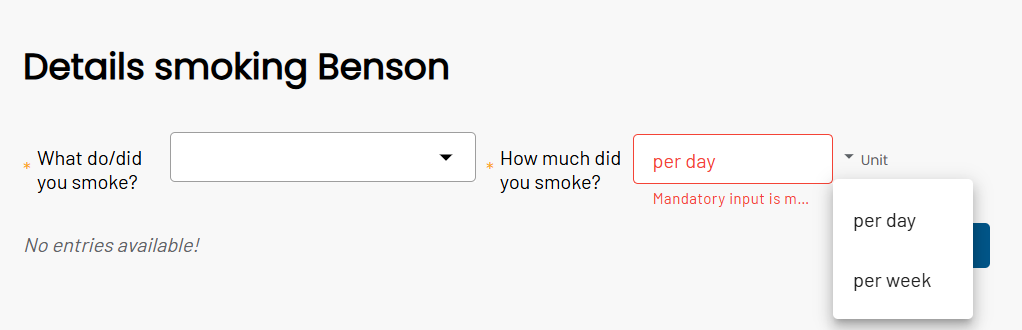
The unit is specified in the frame. If several units are permitted, a combo box at the end of the field enables selection:
For blood pressure values a pair of number is to be entered:

Text fields
Most text fields are single-line and have a maximum permitted length:
Input takes place as usual. If the maximum length is exceeded, an error message appears:
Fields that allow multi-line input are displayed in a different height:
Selection lists
Selection lists can allow the selection of several values (multiple selection) or just one (single selection).
Single selections are displayed as radio buttons or drop-down lists, depending on the number of possible values:
3 or fewer values:

More than 3 values:
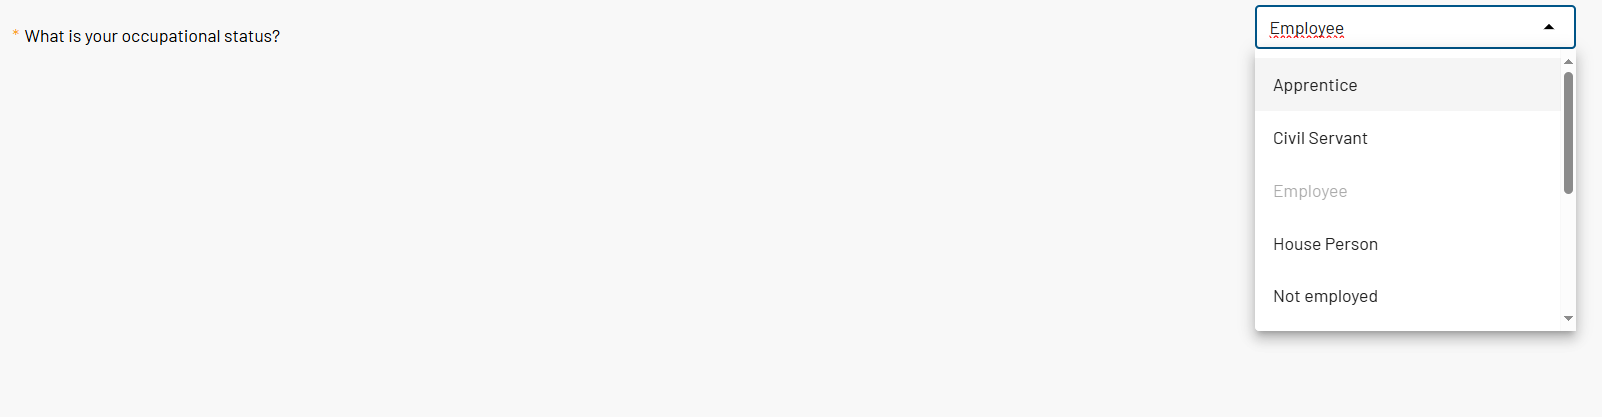
Multiple selections are also initially displayed as drop-down lists. In contrast to the single selection, the selected terms are displayed as follows:
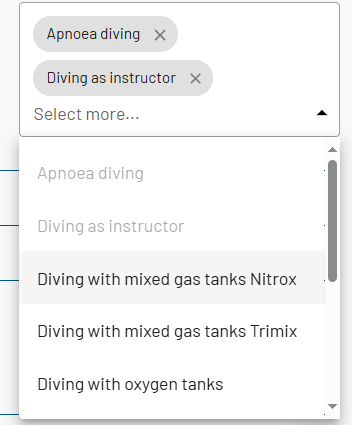
Clicking on the x of a term deselects the value.
Date/Period of time
A date can be defined using the following blue button:

Some date fields allow you to enter a complete date (day, month, year). Others are defined in such a way that they only allow the year, or the entry of year and month.
Accordingly, the dialogues look different:
Year only:
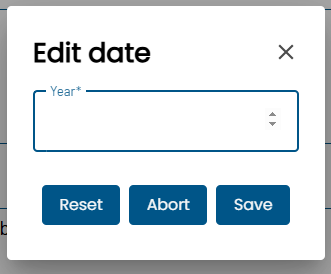
Complete date:
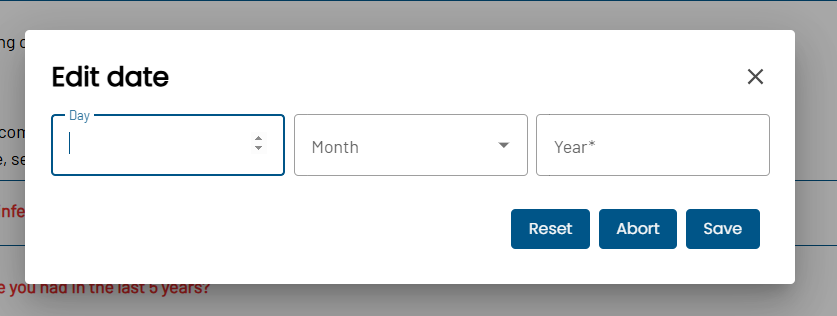
Important: you can also leave the day (see above) or the day and month empty for a date in COMPASS.
This is often used if, for example, a customer needs to specify the start of an illness.
They can usually remember the year and possibly the month.
It is unlikely that they know the exact date.
As a date in the format day + month makes little sense,
the year is a mandatory field and is marked as such by an asterisk.
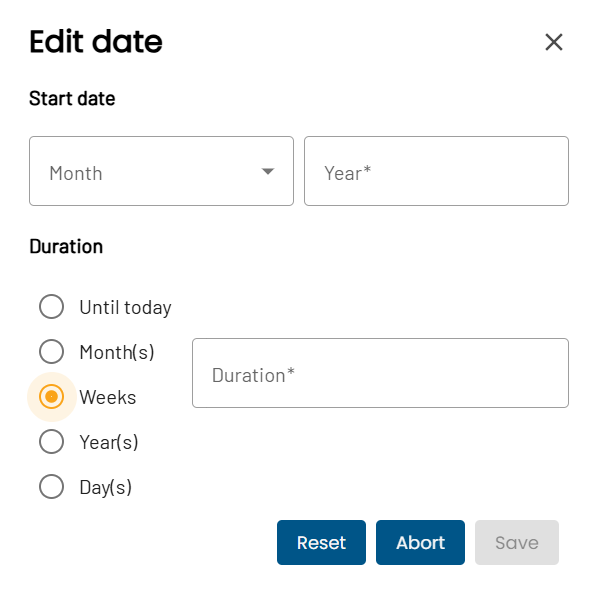
A period of time is displayed in SB2 via a hard-coded widget consisting of a start date and a duration:
Search
Certain text fields start a search dialogue. These are fields asking for
-
Countries and nationalities
-
Sports / Pursuits
-
Diseases / Disorders
-
Professions / Occupations
-
Insurance companies
-
and possibly others (configurable)
By clicking in the text field (here disoders)

the search dialogue opens:
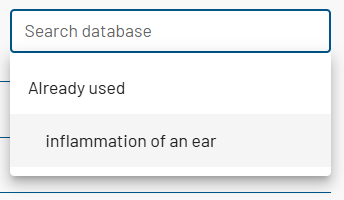
Initially only already used disorders are displayed. You could add these to the current question by clicking on the entry (here inflammation of the ear).
| This dialogue with the Already used-option does not appear for sports, countries and others! |
If you want to add a new disorder, enter the term in the Search database field.
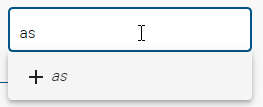
The term, as entered, appears with a + and can be added by clicking on it.
After the third letter is entered, a search is carried out and possible search candidates are offered:
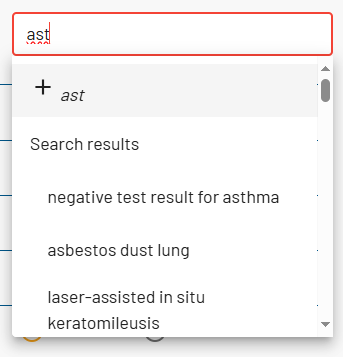
Here, too, you can click on the respective term to add it.
Help texts
When a help text has been defined for a question, a blue ⓘ is displayed, and the help text will be shown when hovering over it:


Nesting / POS cancellation
Within a context, the entry of sports, diseases, countries of travel and some more will lead to a recursive indentation:
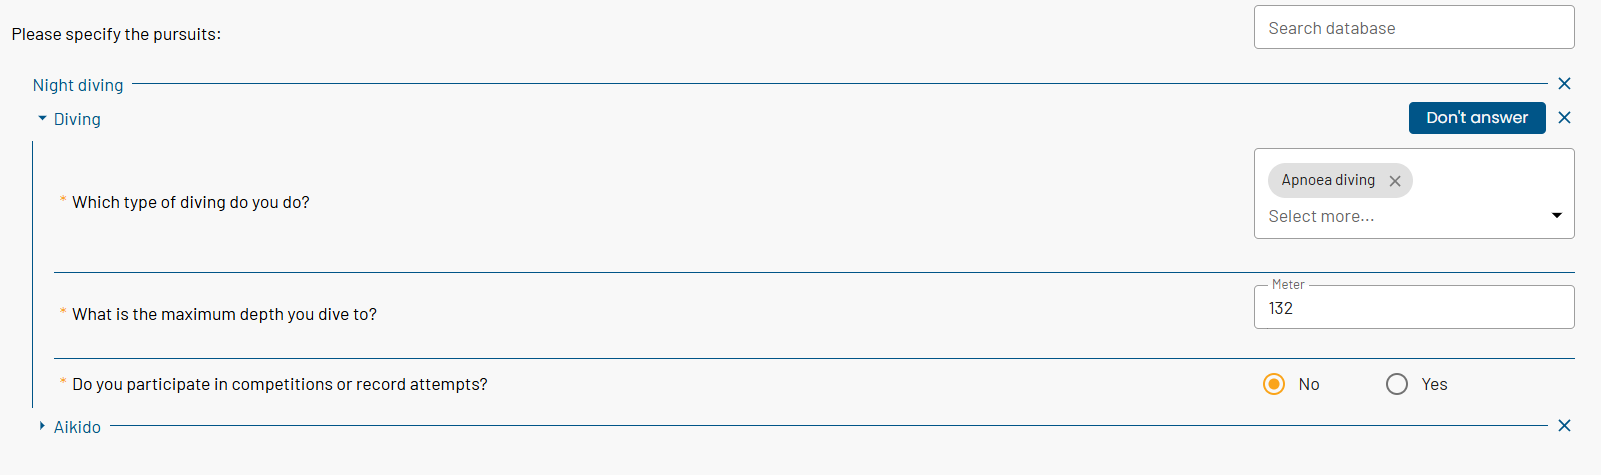
In the image above, the sports are listed individually and their details are listed in
an indented way.
Such an object (here: sport) can be deleted/removed by clicking on the x on the right-hand side.
The ⏵ and ⏷ in front of the term (here: sport) can be used to expand and collapse the details.
For terms with a point-of-sale query, you can omit the details, by clicking on the blue button Don’t answer. However, COMPASS does not reach a final assessment when a query was cancelled in this way.
A cancelled request can be reactivated by clicking on the Answer button that appears for cancelled POS-dialogues:

General description of capturing in SB1 mode
An application-capturing in SB1 mode consists of a screen sequence, where every screen has to be answered.
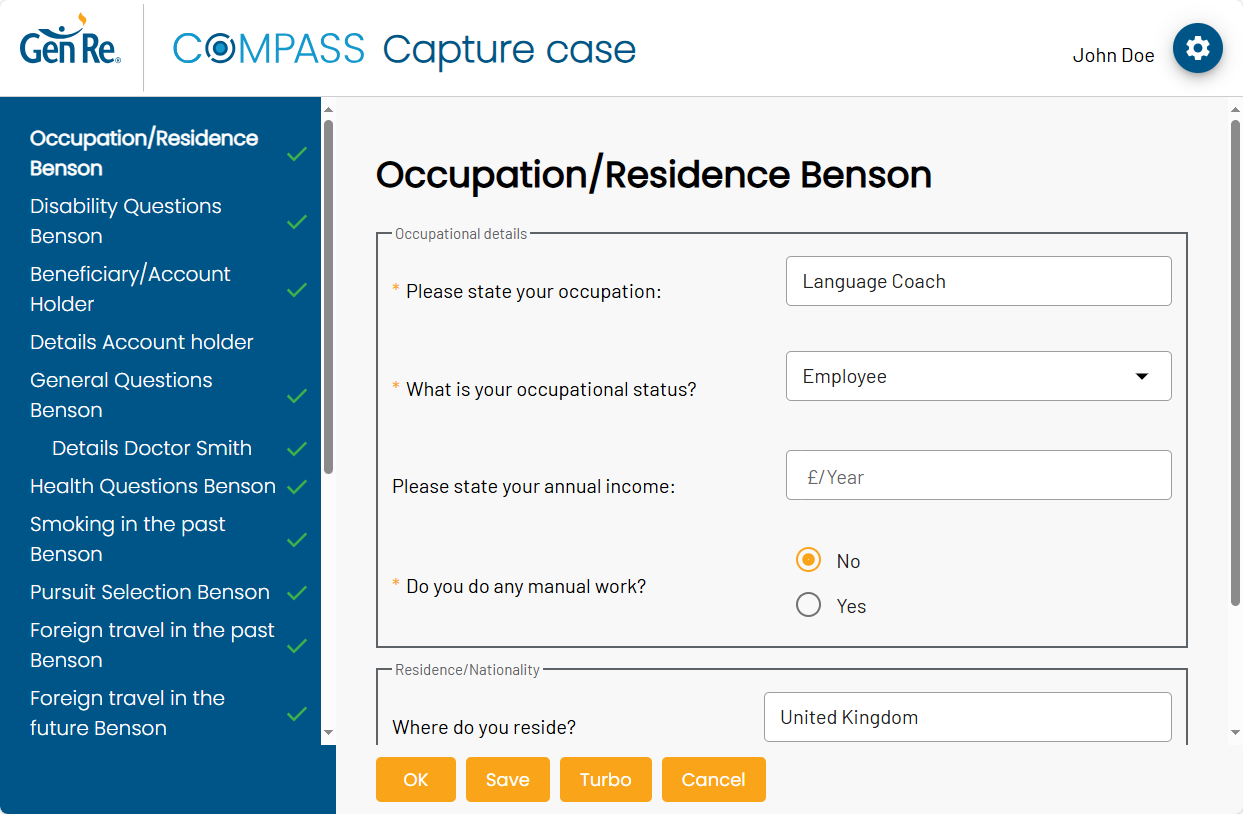
All screens are displayed in the left-hand area as a tree and allow direct navigation to
any of these screens by clicking on them.
Screens that have already been displayed and answered are marked with a green ✓.
The content of the currently selected screen (highlighted in bold) is displayed in the main area.
A button bar is displayed in the lower area, which allows the screens to be processed step by step:
-
OK - process the entered values on the current screen and, if everything is ok so far, go to the next screen.
If you are already on the last screen, pressing OK ends the entry -
Back - go to the previous screen (button is not offered on the first screen)
-
Save - save the current answers in the case XML (in the database)
-
Turbo - process the entered values on the current screen and end the capture if there are no inconsistencies on all screens. Otherwise, jump to the next screen with an inconsistency.
-
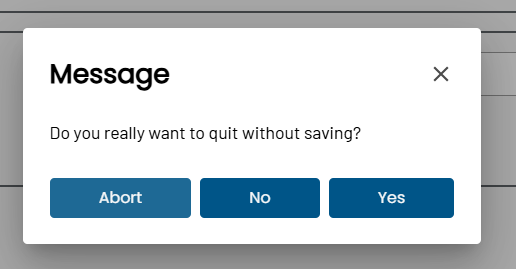
Cancel - cancel the capture. You will be asked whether you indeed want to cancel the capturing dialogue
If COMPASS is running in a multilanguage version, a language selection menu is displayed on the left-hand side.
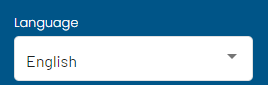
If the language is changed here, the screen is shown in the selected language.