:sectlinks:https://genre@dev.azure.com/genre/Compass-Dev/_git/CompassDocs
Case Print
Introduction
COMPASS can create a summary of questions and answers in HTML, PDF or XML for an existing case. A case is defined here as the collection of questions and answers that have been displayed during the recording of the insurance application process; or more technical: a case is an interface as described in the document Input Interface
This operation is provided either by the API-call writeTextualCase or an end-point of Compass Service
(see either The writeTextualCase Operation or COMPASS Service API documentation: printApplication).
COMPASS offers 2 variations of the XML representation. One representation is based on the ScreenBuilder 2 protocol, while the traditional XML is based on the ScreenBuilder 1 protocol. A HTML representation only exists for ScreenBuilder 1 protocol. A PDF representation exists for both protocols.
Independently of the Screenbuilder protocol, COMPASS will internally create an XML-formatted output. When output as XML has been requested, this XML-formatted case will be passed back to the client. Two subchapters explain the new and the traditional XML format. The XML representation can be used as a basis for a transformation via XSL-T or similar to produce an output that is different from the ones shipped with COMPASS.
If HTML or PDF is requested, COMPASS transforms the XML into HTML/PDF using XSL Transformations (XSL-T). The transformation files are part of the deployment, and can be used to adapt the HTML/PDF output by modifying them. The XSL transformations are explained in DTD of the ScreenBuilder 1 XML representation or DTD of the ScreenBuilder 2 XML representation.
For the understanding of this document, a basic knowledge of HTML, XML, XSL-T and COMPASS' Screenbuilder protocol (version 1 and 2) is required,
The writeTextualCase Operation
DTD of the writeTextualCase Operation
This chapter describes the operation writeTextualCase and common principles of how to print a case and adapt the desired output.
For the REST-API please refer to COMPASS Service API documentation: printApplication.
The description of the adaption of the XSL-T stylesheet is valid for both the operation writeTextualCase and printApplication.
The writeTextualCase operation requires a case as input and creates a textual result. Thus the writeTextualCase needs a caseSourceReference and a textDestinationReference that specify where COMPASS finds the Input Interface and where it should place the textual result. Please refer to API Overview for more details about requests, operations, caseSourceReference and textDestinationReference.
The DTD of the writeTextualCase operation can be found in the file ./config/dtd/request.dtd and is as follows:
<!ELEMENT writeTextualCase (caseSourceReference, textDestinationReference)>
<!ATTLIST writeTextualCase
	language      CDATA                                        #REQUIRED
	sourceType    CDATA                                        #REQUIRED
	loggingArea   CDATA                                        #REQUIRED
	checkCaseData (NoCheck | OnErrorWarning | OnErrorCancel)   "NoCheck"
	textType      (HTML | XML | PDF)                           "HTML"
	groupScreens  (true | false)                               "false"
>
Description of Attributes for the writeTextualCase Operation
language |
This mandatory attribute contains the locale / language, which is the default language during the operation. The content is formatted accordingly to ISO 639-1: e.g. „en“ for English, „de“ for German, „pl“ for Polish etc. The supported languages can be found in the compass.properties - file of the COMPASS environment. |
sourceType |
This mandatory attribute contains the ID of a SourceType. Only screens, questions and answers defined in this SourceType will be printed during the operation. Please refer to Input Interface for more information about SourceTypes. |
loggingArea |
This mandatory attribute contains a number that denotes the scope of logging information COMPASS will write during the operation. Pass “0” when no logging is desired. Please refer to Logging for more details about logging. |
checkCaseData |
This attribute is not required; possible values are “NoCheck”, “OnErrorWarning” and “OnErrorCancel”. NoCheck will be assumed, if the attribute is missing. The value of this attribute defines how COMPASS will react if the case is not correct: NoCheck means that nothing is done; OnErrorWarning means that a warning is issued, and OnErrorCancel means that the operation is cancelled. The server response will then contain a return code other than 0. |
textType |
This attribute is not required; possible values are When XML: The textual representation of the operation HTML: The textual representation of the operation PDF: The output of the operation |
groupScreens |
This attribute is not required; possible values are “true” and “false”. “false” will be assumed when the attribute is missing. false: the generated XML will be based on the ScreenBuilder 1 protocol (see DTD of the ScreenBuilder 1 XML representation) true: the generated XML will be based on the ScreenBuilder 2 protocol (see DTD of the ScreenBuilder 2 XML representation). Do not combine with |
XML-Examples for the operation writeTextualCase
Textual Case as a directTextReference
In this example, a client sends a request that calls the API writeTextualCase. The Input Interface is stored in the database with the ID "Case001" in the Subsystem "TEST". The textual output of the case is passed back to the client via memory reference, i.e. it is described as a directTextReference:
<?xml version="1.0" encoding="ISO-8859-1"?>
<request>
  <operation>
    <writeTextualCase language="en" sourceType="103" loggingArea="0" textType="HTML">
      <caseSourceReference>
        <databaseReference subId="TEST" id="Case001"/>
      </caseSourceReference>
      <textDestinationReference>
        <directTextReference>
        </directTextReference>
      </textDestinationReference>
    </writeTextualCase>
  </operation>
</request>
The operation writeTextualCase is wrapped in a request that is sent to COMPASS. The attributes for the operation writeTextualCase are described in the following table:
language |
In this example the value is “en“, as Case001 is a case in English |
sourceType |
The value 103 is the ID for a specific SourceType. Please use the |
loggingArea |
The value “0” means that COMPASS does not log during the processing of the operation. |
checkCaseData |
In this example this attribute is not specified, thus ”NoCheck“ is assumed. COMPASS will not check the Input Interface during the operation. |
textType |
The value “HTML” denotes that the textual representation of the case will be in HTML format. |
groupScreens |
Attribute is missing, therefore a XML based on ScreenBuilder 1 protocol is generated. |
As the request above specified that the textual case would be passed back via memory reference, a possible response from COMPASS looks like the following response structure:
Please be aware that carriage returns in this example have been inserted only for better readability and are not part of the response by COMPASS. Additionally, the HTML contains several escape sequences for special HTML characters that could not be displayed within the overall XML structure. These escape sequences should be converted back to proper HTML characters so that the HTML can be viewed in a browser.
<?xml version="1.0" encoding="Unicode" standalone="no"?>
<response>
<operationResult returnCode="0">
<textDestinationReference>
<directTextReference text="<ul xmlns:
fo="http://www.w3.org/1999/XSL/Format"
style="list-style-type:none; color:red; font-weight:bold;
font-family:’Arial Unicode MS’,’Wide Latin’;font-size:large">
<h2>Application Case001</h2>
<li>
<table border="0">
[ .... ]
</table>
</li>
</ul>"/>
</textDestinationReference>
</operationResult>
</response>Textual Case as a fileReference
This second example is similar to the one in Textual Case as a directTextReference with the following difference:
The textual output of the case is written to the file Print\case.xml, and the output is now XML based on the ScreenBuilder 2 protocol:
<?xml version="1.0" encoding="ISO-8859-1"?>
<request>
 	<operation>
		<writeTextualCase language="en"
                                  loggingArea="0"
                                  textType="XML"
                                  groupScreens="true"
                                  sourceType="103">
			<caseSourceReference>
				<databaseReference subId="TEST" id="Case001"/>
 			</caseSourceReference>
 			<textDestinationReference>
                                  <fileReference file="Print\case.xml">
                                  </fileReference>
 			</textDestinationReference>
 		</writeTextualCase>
 	</operation>
</request>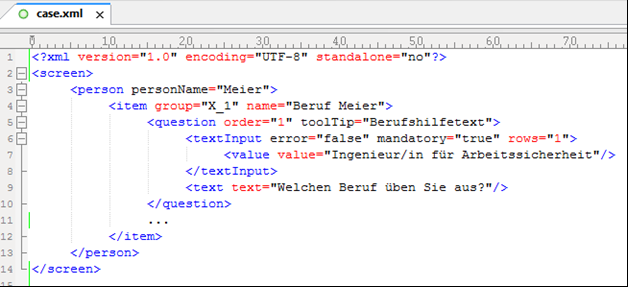
XML - Structure
Whenever the operation writeTextualCase or the Service endpoint printApplication
is called, COMPASS will internally first create the XML representation of the case summary.
When a HTML or PDF representation has been requested, the server will create the HTML/PDF representation based on the XML.
The corrsponding XSL-transformations as described in the following chapters separately for ScreenBuilder 1 and ScreenBuilder 2.
It is important to understand the structure of the XML representation in the following situations:
-
The XSL-transformations shipped with COMPASS shall be modified to create a slightly different HTML/PDF result. The implications of the modifications on the XSL-transformations can be better understood if the structure of the XML representation is clear.
-
The client requests the XML representation of the textual application and wants to build an own textual/visual representation of the application, e.g. as a Word document, a PDF-file, or a more complex HTML page that can’t be achieved by modifying the shipped XSL-transformation files.
Chapters DTD of the ScreenBuilder 1 XML representation and Structure of a SB 1 XML representation handle the XML based on ScreenBuilder 1 protocol, while chapters DTD of the ScreenBuilder 2 XML representation and Explaining the structure of a SB 2 XML representation describe the XML based on the ScreenBuilder 2 protocol.
DTD of the ScreenBuilder 1 XML representation
The XML representation of the operation writeTextualCase for ScreenBuilder 1 protocol is wrapped in the XML element reportPrintSection.
This reportPrintSection contains 1 or more casePrintSections. Every casePrintSection has a header-text that is stored in the attribute heading.
Its attribute id contains a string “n_mmm“ where n is a number that denotes the type of the CaseObject (e.g. 27 for Assured Persons),
and mmm stands for the textual representation of the id-attribute of the object.
A further attribute tells us whether a POS-Module for this CaseObject has been cancelled.
The value of the attribute cancelled is true, if and only if there was a POS-Module which was cancelled by the user.
Additionally every casePrintSection can contain other casePrintSections or screens. A screen is a structure that describes a screen. screens and their sub elements like groups or questions are described in detail in the document Screenbuilder 1.0 protocol.
Thus we have the following DTD:
<!ELEMENT casePrintSection (casePrintSection*, screen*)>
<!ATTLIST casePrintSection
	heading   CDATA          #REQUIRED
	id        CDATA          #IMPLIED
	cancelled (true | false) "false"
>

<!ELEMENT reportPrintSection (casePrintSection+)>
Structure of a SB 1 XML representation
A casePrintSection groups all information from the application for a certain context. This context can be an AP (assured person), a disorder, a pursuit, etc. Technically we can say that every CaseObject of the Input Interface is represented by a casePrintSection, as long as there is displayable information about the CaseObject.
casePrintSections that wrap another casePrintSection stand for a certain relation between the two related CaseObjects. E.g. a casePrintSection for the AP “James Bond” can contain another casePrintSection for a disorder “diabetes”; what tells us that James Bond suffers from diabetes. In this case the sub-casePrintSection for diabetes contains all the details about the diabetes, e.g. start date, hospitalisation (yes/no), etc.
Every casePrintSection has a heading (as described by the DTD), which specifies a “title” for the section, and contains the name of the related CaseObject. It makes sense to display this heading-text, so that the following information can be related to the CaseObject.
The sequence of screens and casePrintSections within a casePrintSection corresponds to the sequence of screens as defined in the SourceType. It makes sense to display the screens in the order as given by the XML representation, as this reflects the order in which they appeared during the data recording/answering of the application form.
Let us explain using the following example of an XML representation:
<?xml version="1.0" encoding="Unicode" standalone="yes"?>
<reportPrintSection>
   <casePrintSection heading="Application Case001" id="25_Case001">
      <casePrintSection heading="AP James Bond" id="27_007">
         <screen id="_" title="Occupation/Residence James Bond">...</screen>
         <screen id="_" title="General Questions James Bond">...</screen>
         <screen id="_" title="Pursuit Selection James Bond">...</screen>
         <casePrintSection heading="Pursuit Boxing" id="26_Boxing">
            <screen id="_" title="Details Pursuit Boxing">...</screen>
         </casePrintSection>
         <casePrintSection heading="Pursuit Golf" id="26_Golf">
            <screen id="_" title="Details Pursuit Golf">...</screen>
         </casePrintSection>
         <screen id="_" title="Disorder Selection James Bond">...</screen>
         <casePrintSection heading="Disorder asthma" id="8_asthma">
            <screen id="_" title="Details Disorder asthma">...</screen>
         </casePrintSection>
         <screen id="_" title="Disorder CI James Bond">...</screen>
      </casePrintSection>
      <screen id="_" title="Beneficiary/Account Holder">...</screen>
      <screen id="_" title="Further details/information/documents">...</screen>
   </casePrintSection>
</reportPrintSection>
In the application form, as defined in the SourceType, the details for “Golf” and “Boxing” have been asked directly after the screen “Pursuit Selection James Bond”. Thus the casePrintSections for these CaseObjects (Golf and Boxing) have been included right after this screen.
The customer is nevertheless free to rearrange the screens in their visualisation, if another order is preferred.
Screens with some of their elements (buttonRow, message and navigation elements do not appear in this context) should be displayed as explained in the ScreenBuilder documentation.
One exception is their id-attribute. This attribute contains basically the value underscore “_”.
DTD of the ScreenBuilder 2 XML representation
The XML representation of the operation writeTextualCase or the Service endpoint printApplication based on the ScreenBuilder 2 protocol are very similar to a screen built for capturing via ScreenBuilder 2. Its DTD is in fact identical and is described by the file config/dtd/screenSB2.dtd.
Explaining the structure of a SB 2 XML representation
The XML - structure of a screen is explained in the document Screenbuilder 2.0 protocol. At this point we will only focus on the differences between a SB2 capture-screen and a SB2 application-print screen.
The main difference is the attribute current for an item. During capturing, exactly one item receives the attribute current with its content = "true", while all other items have their current - attribute set to "false". In the application-print screen, all items have their current - attribute set to "true". I.e. all items contain their full set of questions and answers.
There are many attributes of the XML-elements that are most likely unnecessary for the application print.
Nevertheless, they have been kept maintaining an identical structure between both XML screens. A list of (probably unnecessary) attributes follows:
For the item element:
|
is always on |
|
generated number, which can change |
|
items are listed in the correct order |
|
is identical to the attribute personName of the |
For the person element:
|
name of the |
|
ID of the |
|
LTR for Left To Right, RTL for Right To Left |
For the question element:
|
generated number, which can change |
|
items are listed in the correct order |
|
items are listed in the correct order |
For the relation element:
|
Command ID for interaction |
|
Command ID for interaction |
|
Command ID for interaction |
|
generated number, which could change |
For the textInput element:
|
is identical to the attribute |
|
irrelevant, as the “print” should always be non-editable |
|
could be used, but unlikely |
|
no use foreseeable |
For the text element:
|
The corresponding input-element contains the same information |
For the value element:
|
internal ID for this value. No use foreseeable |
For the relationElement element:
|
generated ID, which is dynamic |
|
information for interaction |
|
could be used, but unlikely |
For the numberInput element:
|
is identical to the attribute |
|
irrelevant, as the “print” should always be non-editable |
|
no use foreseeable |
For the unit element:
|
internal ID for the unit-name. No use foreseeable |
For the selection element:
|
is identical to the attribute |
|
no use for this information foreseeable |
|
irrelevant, as the “print” should always be non-editable |
For the dateInput element:
|
is identical to the attribute |
|
irrelevant, as the “print” should always be non-editable |
HTML-Output
General Information
Starting from the XML representation of the application, COMPASS will create an HTML representation of the application data,
if the operation writeTextualCase or the endpoint printApplication are configured accordingly.
For the transformation from XML to HTML COMPASS uses the XSL-T technology and requires several style-sheets, that can be modified by the customer to achieve a different appearance of the generated HTML-output.
A basic understanding of the previous chapter and the definition of a screen
(see Screenbuilder 2.0 protocol or Screenbuilder 1.0 protocol)
is required for this chapter. Some basics are explained below:
A simple screen like
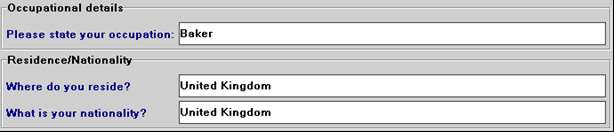
is represented by the XML - element screen (only some sections shown):
<screen id="_" title="Occupation/Residence James Bond">
  <group name="Main group" id="2993">
    <layout> [...] </layout>
    <group name="Occupational details" id="233">
      <layout> [...] </layout>
      <group name="Inputgroup" id="3002">
        <layout> [...] </layout>
        <question name="Occupation" id="_8">
          <layout> [...]</layout>
          <textInput id="209" rows="1" editable="false" columns="40" error="false">
            <position [...]></position>
            <appearance [...]></appearance>
            <value id="252" value="Baker"></value>
          </textInput>
        </question>
        <text id="2211" text="Please state your occupation:" optimizeWidth="true" error="false">
          <position [...]></position>
          <appearance [...]></appearance>
        </text>
      </group>
    </group>
    <group name="Residence/Nationality" id="3008">
      [...]
    </group>
  </group>
</screen>
Every screen consists of a group, which again can consist of several other groups. Groups can contain texts, answer fields, selection boxes and other graphical widgets. All of these elements have a position, appearances, layouts, etc.
During the transformation from a screen to the HTML output all these attributes (height, position, fillStrategy, etc) have to be considered. The result will look like:
<table height="0%"  width="100%" rules= "none" cellpadding="2"  cellspacing="0" border="0">
  <tr valign="top" align="left">
    <th rowspan="1" colspan="100" height="1">Occupational details</th>
  </tr>
  <tr valign="top">
    <td valign="top" align="left">
      <table height="0%" width="100%" rules="none" cellpadding="0" cellspacing="0" border="0">
        <tr valign="top">
          <td valign="middle" align="left"> Please state your occupation:</td>
          <td valign="top" align="left">
            <input readonly="yes" size="40" name="_10#425" class="inputFieldsStd"
                   value="" type="text" disabled="true">
          </td>
        </tr>
 [...]
When using COMPASS to generate the HTML output, you might redefine the SourceType with the RulemanagerApp to create a more “printable” output.
This includes the selection of other widgets (radio buttons vs. selection boxes, other colours, changing the screen order, etc). It is convenient to not modify the existing SourceType, but to create a copy of the SourceType for your modifications.
Additional modifications on the appearance of the HTML result can be achieved via adapting the XSL Style Sheets.
The XSL Style-Sheets
Five XSL-style sheets are required by COMPASS to generate HTML based on the XML output of the operation writeTextualCase or the Service endpoint printApplciation. These five files can be found in the script-directory of your COMPASS installation, and are explained in detail in the following:
universal.xsl
This style sheet is the starting point for the transformation of the XML representation.
The file includes references to all other xsl-files, and includes the template screen,
which is responsible for the transformation of the screen element.
Additionally, this file includes several templates for the transformation of all kinds of XML-elements into HTML.
caseprint.xsl
Every screen element is wrapped in a casePrintSection. The template for the casePrintSection is included in this file. This template is responsible for the applying of the screen-template (located in universal.xsl) for each scree.
Most modifications of the layout of the HTML result (e.g. adding the corporate logo, changing background colours, etc) should be applied to this style sheet.
group.xsl
This style sheet is responsible to place the screens and groups at specific positions, as defined by the RulemanagerApp. Be aware that the positions on the resulting HTML screens will not perfectly match the Swing-representation as shown by RulemanagerApp. We recommend to not modify this style sheet.
Two examples for modifications via style-sheets
Adding a corporate logo
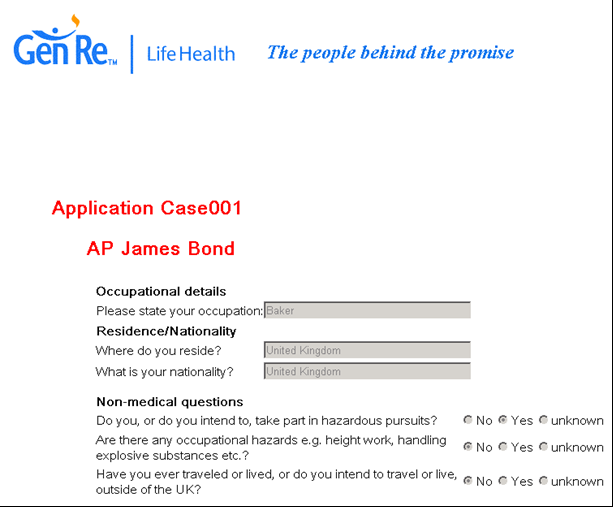
We want to add the following logo at the top of the application printout:

We assume that the logo on the left can be found under sampleImages/GCR_Logo.jpg. Below is the corresponding HTML code for the complete logo:
<table>
<tr>
<td><img src="sampleImages/GCR_Logo.jpg"/></td>
<td style="font-size:18pt;font-weight:bold;font-style:italic;color:rgb(22,117,235);
line-height:53pt">The people behind the promise<br> </br>
</td>
</tr>
</table>As suggested in the description of caseprint.xsl, we recommend to apply desired changes for the XSL-transformation using the style-sheet caseprint.xsl. Within this file the reportPrintSection-template will have to be adapted.
The reportPrintSection-template is quite simple: it only has a reference to the included casePrintSection-template. Two blocks of comments define the area where header information or footer information can be inserted into the template:
	<xsl:template name="reportPrintSection" match="reportPrintSection">
		<!-- header starts here -->
		<!-- header ends here -->
	     <xsl:call-template name="casePrintSection"></xsl:call-template>
		<!-- footer starts here -->
		<!-- footer ends here -->
	</xsl:template>
In this case the HTML-code containing the logo has to be inserted between the lines “<!-- header starts here -→” and “<!-- header ends here -→”, resulting in the following template:
<xsl:template name="reportPrintSection" match="reportPrintSection">
<!-- header starts here -->
<table>
<tr>
<td><img src="sampleImages/GCR_Logo.jpg"/></td>
<td style="font-size:18pt;font-weight:bold;font-style:italic;color:rgb(22,117,235);
line-height:53pt">The people behind the promise<br> </br>
</td>
</tr>
</table>
<!-- header ends here -->
<xsl:call-template name="casePrintSection"></xsl:call-template>
<!-- footer starts here -->
<!-- footer ends here -->
</xsl:template>This modified xsl-transformation will create the following HTML-code (extract):
<table xmlns:fo="http://www.w3.org/1999/XSL/Format">
<tr>
<td>
<img src="Images/GCR_Logo.jpg">
</td>
<td style="font-size:18pt;font-weight:bold;font-style:italic;color:rgb(22,117,235);line-
height:53pt">The people behind the promise
<br> </br>
</td>
</tr>
</table>
<ul xmlns:fo="http://www.w3.org/1999/XSL/Format" style="list-style-type:none; color:red; font-
weight:bold;font-family:'Arial Unicode MS','Wide Latin';font-size:large">
<li>
<table border="0">
<tr>
<td>
<ul style="list-style-type:none; color:red; font-weight:bold;font-family:'Arial Unicode MS','Wide Latin';font-size:large">
<h2>Application Case001</h2>
<li>
[…]The output of the transformation can be viewed with any CSS-enabled HTML-browser:
Removing the indentation of the case-sections
COMPASS’ style sheets create an indentation for groups, when these groups reflect a relation to the higher group, e.g. the group “Pursuit Boxing” is a subgroup of the group “AP James Bond”. Speaking in XML-terms, every casePrintSection that is defined within another casePrintSection is more indented than the higher group:
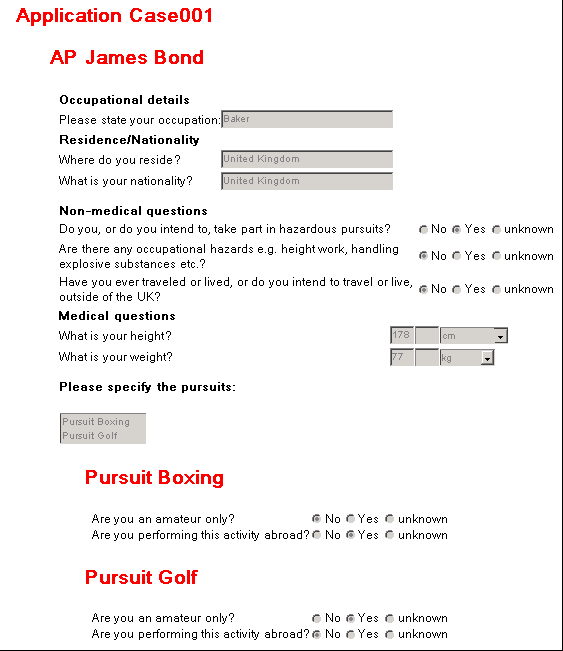
Goal of this example is to replace the indentation by a horizontal line that will represent the relation between “Pursuits” and “Pursuit Boxing”.
As in the previous example, the casePrintSection template in the caseprint.xsl style sheet is responsible for the layout of each section, and therefore we will analyze it:
<xsl:template name="casePrintSection" match="casePrintSection">
   <ul style="list-style-type:none; color:red; font-weight:bold;font-family:’Arial Unicode
		 MS’,’Wide Latin’;font-size:large">
      <h2><xsl:value-of select="@heading"/></h2>
      <li>
         <table border="0">
            <tr>
               <td>
                  <xsl:for-each select="child::*">
                     <xsl:choose>
                        <xsl:when test="contains(name(),'casePrintSection')">
                           <xsl:call-template name="casePrintSection" />
                        </xsl:when>
                        <xsl:when test="contains(name(),'screen')">
                           <xsl:call-template name="screen" />
                        </xsl:when>
                     </xsl:choose>
                  </xsl:for-each>
               </td>
            </tr>
         </table>
      </li>
   </ul>
</xsl:template>
This template is used recursively for each section, and the Unsorted List (“<ul>” and “<li>”) creates the indentation for each section.
For our purpose the Unsorted List will be replaced by a paragraph “<p>” with a Horizontal Ruler “<hr></hr>”. Additionally, we will delete the table definition. Another minor modification was to delete the “<h2>”-tag, as the style-sheet for a paragraph (“<p>”) will not work within a heading-tag; i.e. the name of the casePrintSection would not have been printed in red. This gives us the following template (original code has been commented out):
<xsl:template name="casePrintSection" match="casePrintSection">
   <p style="list-style-type:none; color:red; font-weight:bold;font-family:’Arial Unicode
			 MS’,’Wide Latin’;font-size:large">
   <hr></hr>
   <!—
   <ul style="list-style-type:none; color:red; font-weight:bold;font-family:’Arial Unicode
				  MS’,’Wide Latin’;font-size:large"> -->
   <xsl:value-of select="@heading"/>
      <!--
      <li>
         <table border="0">
            <tr>
               <td> -->
                  <xsl:for-each select="child::*">
                     <xsl:choose>
                        <xsl:when test="contains(name(),'casePrintSection')">
                           <xsl:call-template name="casePrintSection" />
                        </xsl:when>
                        <xsl:when test="contains(name(),'screen')">
                           <xsl:call-template name="screen" />
                        </xsl:when>
                     </xsl:choose>
                  </xsl:for-each>
               <!--
               </td>
            </tr>
         </table>
      </li>
   </ul>
   -->
   </p>
</xsl:template>
The same template without the comments:
<xsl:template name="casePrintSection" match="casePrintSection">
   <p style="list-style-type:none; color:red; font-weight:bold;font-family:’Arial Unicode
			 MS’,’Wide Latin’;font-size:large">
      <hr></hr>
      <xsl:value-of select="@heading"/>
      <xsl:for-each select="child::*">
         <xsl:choose>
            <xsl:when test="contains(name(),'casePrintSection')">
               <xsl:call-template name="casePrintSection" />
            </xsl:when>
            <xsl:when test="contains(name(),'screen')">
               <xsl:call-template name="screen" />
            </xsl:when>
         </xsl:choose>
      </xsl:for-each>
   </p>
</xsl:template>
The result of this modification of the transformation can be viewed in the following HTML file displayed by a browser:
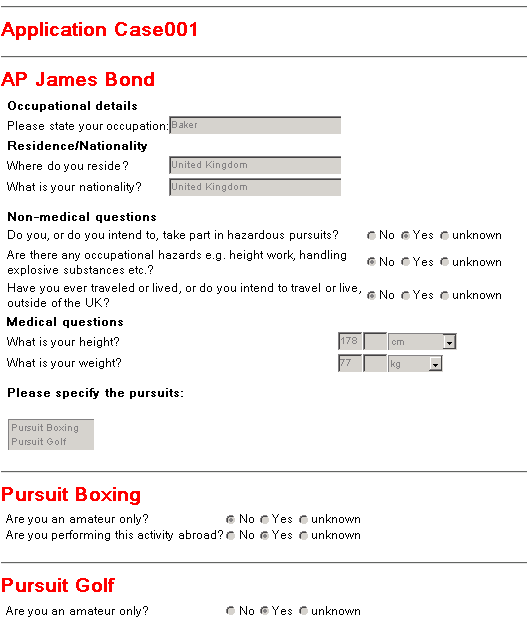
PDF-Output
General Information
Starting from the XML representation of the application, COMPASS will create a PDF representation of the application data,
if the operation writeTextualCase / the Service endpoint printApplication are configured accordingly.
The transformation to PDF uses the Apache FOP processor. The XSL files are therefore XSL-FO layout descriptions. Currently the FOP version 2.1 is required.
To create such a XSL-FO file, a basic understanding of the definition of a screen
(see Screenbuilder 1.0 protocol or Screenbuilder 2.0 protocol)
is required. Chapter HTML-Output does include a description of a screen.
When using COMPASS to generate the PDF output, you might redefine the SourceType with the RulemanagerApp to create a more “printable” output. This includes the selection of other widgets (radio buttons vs. selection boxes, other colours, changing the screen order, etc). It is convenient to not modify the existing SourceType, but to create a copy of the SourceType for your modifications.
Additional modifications on the appearance of the PDF can be achieved by adapting the XSL Style Sheet described in the next lines:
To transform a ScreenBuilder 1 XML - document into PDF, the file script/pdfConverter.xsl is used.
An application according to the ScreenBuilder 2 - protocol is transformed into PDF with the file script/pdfConverter2.xsl.
It is possible to further modify the XSLT-files with any appropriate tool/editor.
The XSL Style-Sheet
When COMPASS is shipped, sample XSL-files script/pdfConverter.xsl and script/pdfConverter2.xsl are included in the delivery.
COMPASS needs this file to be placed in the script - directory. The generated output of the operation writeTextualCase / the Service endpoint printApplication is located in the ./casedata directory.
We will not go into detail here about this XSL-file, but it is worth mentioning that the sample XSL-files include references to some images that are also part of the delivery which can be found in the script/images directory.
The shipped transformation makes use of some third party jars, which are
commons-io-1.3.1.jar
commons-logging-1.2.jar
xmlgraphics-commons-2.1.jar
batik-anim-1.14.jar
batik-constants-1.14.jar
batik-i18n-1.14.jar
batik-parser-1.14.jar
batik-shared-resources-1.14.jar
batik-util-1.14.jar
batik-xml-1.14.jar
fop-2.7.jar
fop-core-2.7.jar
fop-events-2.7.jar
fop-util-2.7.jar
xmlgraphics-commons-2.7.jar
Resources
When COMPASS is shipped, certain fonts are required to produce the suggested PDF look and feel. These fonts are typically part of the Windows operating system, so you will not notice in case they are not included in the deployment.
This might be different, particularly when COMPASS runs on an operating system such as Linux. In this case, those fonts have to be downloaded somewhere and made available. This can be done by placing them in the default operating system fonts directory or into the COMPASS directory ./script/fonts.
The following fonts are required, and are not shipped due to license reasons:
arial.ttf
arialbd.ttf
arialbi.ttf
ariali.ttf
times.ttf
timesbd.ttf
timesbi.ttf